I have noticed our renovation activity hibernating, for lack of a better word, during deep winter. We've got kids in the house, stuff going on (besides an unfinished dining room), it's "seal your house like a ziploc" weather and that means no painting, no powertools, no sanding.
It's frustrating. The most we have been able to do is decrapulate the living areas of the house, and I'm going nuts. Well, okay, I did put up drapes and make a lampshade, but that's girly stuff and I need to wield power tools, sand something, or whip out the paint.
Imagine my relief that we had some false spring today. I crawled out of my cave, scratched my back on a tree, and got to work on the sun porch (the office-to-be). I got to use a Very Small Power Tool - Dremel tools make a satisfying motor-noise, even if it is in the soprano section of the power tool choir. I've now altered all the fake mullions on the modern Andersen casements to look at least sort-of Arts & Crafts. They are now divided into four small square "panes" over one big "pane," and I cannot express how much better it already looks from the road.
I also removed the last two interior storm windows (put up before the porch was enclosed), so we can use the windows to move air through the house from the sunporch. I feel vindicated.
Back to the cave.
Showing posts with label sympathetic redesign. Show all posts
Showing posts with label sympathetic redesign. Show all posts
Wednesday, February 21, 2007


Sunday, February 04, 2007
What a difference a latch makes!
We posted a couple weeks ago about ordering a new latch for FX's room, so we didn't need to use bungee cords to keep his door closed anymore. We received it Tuesday and installed it Wednesday. What was the delay? Since I didn't post about this before - we had our Very First Houseguests (waves to C and C all the way in California) and have spent the last couple of days recovering- I'm posting now. Please forgive me, dust covered and paint spotted readers.
A little bit of related news before getting to the mechanical focus of the day: We also ordered a can of Craftsman Furniture Polish and a roll of low-friction tape. The furniture polish is nice, but most of our wood is so very far past only needing polish that it's not a cure-all. We really need to suck it up and refinish our furniture. Works great on the moldings, though. The low-friction tape, however, has made our old and battered bombe front chest of drawers work like a dream, which it never did before. Getting clothes in the morning was like an episode of Ultimate Fighting Championships, and now it's not.
I also made some drapes for the living room, and made a kid-kitchen in our corner cabinet, but the batteries in the camera are dead, so that's another day's news.
Now to the main event:
The latch works great. It makes FX's door actually function as a door should. It even came with all the hardware we might need, though we didn't need anything except the latch and the screws (we also got 2 spare strikeplates and their screws). That said, there are few caveats for anyone else looking to replace a 1910's latch-only assembly. They are:
All in all, the job took about 3x as long, but that's maybe half an hour, considering that a direct parts swap would have taken 10 minutes. I should not neglect to mention that I put the latch in backwards after I'd gotten everything set, and had to pull the knob, the spindle, and the latch and put it all back the right way. And, really, I was prepared for potential difficulties, since repro parts rarely fit exactly like the originals. But, oh, that would have been nice...
The end of the story is that our 4 year old now has a door that works, for his birthday. That would be the other reason for a delay in reporting - we threw a birthday party for him. At Pizza Hut. No, the dining room really isn't ready for six four year olds to be throwing cake in it. It may never be, even if we do eventually get it painted.
A little bit of related news before getting to the mechanical focus of the day: We also ordered a can of Craftsman Furniture Polish and a roll of low-friction tape. The furniture polish is nice, but most of our wood is so very far past only needing polish that it's not a cure-all. We really need to suck it up and refinish our furniture. Works great on the moldings, though. The low-friction tape, however, has made our old and battered bombe front chest of drawers work like a dream, which it never did before. Getting clothes in the morning was like an episode of Ultimate Fighting Championships, and now it's not.
I also made some drapes for the living room, and made a kid-kitchen in our corner cabinet, but the batteries in the camera are dead, so that's another day's news.
Now to the main event:
The latch works great. It makes FX's door actually function as a door should. It even came with all the hardware we might need, though we didn't need anything except the latch and the screws (we also got 2 spare strikeplates and their screws). That said, there are few caveats for anyone else looking to replace a 1910's latch-only assembly. They are:
- It's a little bit smaller. Lengthwise. Just enough (perhaps a sixteenth of an inch?) to make the spindle not line up with its original hole.
- This causes power tools to come out during an install. When one has to enlarge a hole to allow the spindle to move (we could get it through, once the faceplates were off the door, but it didn't move), it's time for Mr. drill.
- This also causes the faceplates to need moving over, so they line up with the new hole. Another job for Mr. Drill.
All in all, the job took about 3x as long, but that's maybe half an hour, considering that a direct parts swap would have taken 10 minutes. I should not neglect to mention that I put the latch in backwards after I'd gotten everything set, and had to pull the knob, the spindle, and the latch and put it all back the right way. And, really, I was prepared for potential difficulties, since repro parts rarely fit exactly like the originals. But, oh, that would have been nice...
The end of the story is that our 4 year old now has a door that works, for his birthday. That would be the other reason for a delay in reporting - we threw a birthday party for him. At Pizza Hut. No, the dining room really isn't ready for six four year olds to be throwing cake in it. It may never be, even if we do eventually get it painted.
Wednesday, January 17, 2007
Castles in the Sky
Or, "Cabinets in the Kitchen." It makes no difference, because one is as real as the other, unfortunately.
However, dreaming can be fun, so I downloaded the Ikea kitchen design software and went on with my imagined redesign of the kitchen. I'd been playing with various configurations for some time in my other 3 remodeling software packages, but this really works well 9this year - last year's crashed on me too much to bother with). We're considering Ikea as a source for reasonably priced cabinetry that we can install ourselves, so this gave me a nice idea about how much it might be to get the whole mess from them (under 7 grand, including fripperies like a stove and a dining area, and not including shipping). There's the added fuzzy of following a kind of tradition - the house and everything in it having originally been ordered from catalogs - even if this is just a pipe dream.
First, here is a rough approximation of what we've got now, Ikea-style:

I'm guessing, from the five or so cabinet doors we found cobbled into a shelf in the cellar, that there was a basic kitchen built-in on the side where the counter is now, possibly also an icebox. The corner cabinet I roughed in in this is a homemade affair, cobbled together (fairly well, actually) form odds and ends of plank and tongue-and-groove boards, and goes from floor to ceiling. I like the midcentury steel cabinets, but they don't go with the house, and we need more storage and more counterspace.
Problems with the kitchen as it stands:
So I have a few things in mind to change, and some things to restore. I started out with a bare room and the knowledge that the original location of the kitchen sink was where the range is now, the stove had been in the inset where our dinette is now, and went from there. I got this:

Wow. I went with one of the more traditional "modern" cabinet fronts, "Ädel," on "Medium Brown," as it seemed more like what was once here. I put the range in the original location of the cookstove, I moved the refrigerator over and put tall cabinets between it and the partial wall for expanded storage (including a broom/cleaning storage closet, which we do not now have), put cabinets on the stove wall, filling the awkward inset with useful things, and relocated the sink to the original sink location, under the short window.
In order to avoid removing or obscuring original features (the long windows, which let so much wonderful light into the kitchen), I elected to put kitchen carts or some other portable storage/workspace solution on either side of the sink. And the dining area? Where the existing sink is, so nobody gets elbowed or bumped during breakfast. The sink I picked is one of two that I really love in the Ikea catalog, the one that looks like a vintage farm sink.
It's so much more usable that I just want to buy it NOWNOWNOW. Of course, this is not possible, and will entail a great deal more than seven thousand dollars, such as living without a kitchen for a couple of weeks while we move plumbing around and install everything. Never mind the money.
However, dreaming can be fun, so I downloaded the Ikea kitchen design software and went on with my imagined redesign of the kitchen. I'd been playing with various configurations for some time in my other 3 remodeling software packages, but this really works well 9this year - last year's crashed on me too much to bother with). We're considering Ikea as a source for reasonably priced cabinetry that we can install ourselves, so this gave me a nice idea about how much it might be to get the whole mess from them (under 7 grand, including fripperies like a stove and a dining area, and not including shipping). There's the added fuzzy of following a kind of tradition - the house and everything in it having originally been ordered from catalogs - even if this is just a pipe dream.
First, here is a rough approximation of what we've got now, Ikea-style:

I'm guessing, from the five or so cabinet doors we found cobbled into a shelf in the cellar, that there was a basic kitchen built-in on the side where the counter is now, possibly also an icebox. The corner cabinet I roughed in in this is a homemade affair, cobbled together (fairly well, actually) form odds and ends of plank and tongue-and-groove boards, and goes from floor to ceiling. I like the midcentury steel cabinets, but they don't go with the house, and we need more storage and more counterspace.
Problems with the kitchen as it stands:
- As you can see, there's LOTS of wasted space.
- The current sink location is both counterintuitive and just plain bad - the supply and waste pipes go through an unheated space under the original back porch).
- There's kind of a work triangle, but not really.
- If we want a vent hood, we will have to cut through the outer wall of the house if the stove stays where it is. Not good.
- There's no eating in the kitchen without traffic bumping into the hapless person next to the door.
So I have a few things in mind to change, and some things to restore. I started out with a bare room and the knowledge that the original location of the kitchen sink was where the range is now, the stove had been in the inset where our dinette is now, and went from there. I got this:

Wow. I went with one of the more traditional "modern" cabinet fronts, "Ädel," on "Medium Brown," as it seemed more like what was once here. I put the range in the original location of the cookstove, I moved the refrigerator over and put tall cabinets between it and the partial wall for expanded storage (including a broom/cleaning storage closet, which we do not now have), put cabinets on the stove wall, filling the awkward inset with useful things, and relocated the sink to the original sink location, under the short window.
In order to avoid removing or obscuring original features (the long windows, which let so much wonderful light into the kitchen), I elected to put kitchen carts or some other portable storage/workspace solution on either side of the sink. And the dining area? Where the existing sink is, so nobody gets elbowed or bumped during breakfast. The sink I picked is one of two that I really love in the Ikea catalog, the one that looks like a vintage farm sink.
It's so much more usable that I just want to buy it NOWNOWNOW. Of course, this is not possible, and will entail a great deal more than seven thousand dollars, such as living without a kitchen for a couple of weeks while we move plumbing around and install everything. Never mind the money.
Wednesday, January 10, 2007
Writer's Block, or Living in the Project
 NOTHING says "house restoration" like patched plaster walls, an extension cord, and a bale of toilet paper. Except possibly the direct view to the bathroom from the front door, and a nifty sepia effect courtesy my camera.
So, here I am, camera in hand, readied to relate the news of living in the house for a whopping 2 weeks, and I find that my grasp of words has failed me.
Utterly.
I find myself thinking "Kitchen ... NO! Bathroom ... wait. Bedroom. Plaster? Yardwork? Snow?" This is followed by a dull moaning sound as my brain's gears fail. Madly, I continue to hunt for things to write about, grasping at "Scrubbing floors, perhaps? Or the kitchen drains? Oooo! How about the cellar?"
I'm not short of things to write about. I'm spoiled for choice. My brain is whirling like a magpie in a sequin factory. Too much to do, too much to tell, not enough focus.
Therefore, with this decision (or lack thereof), I give you some photographs. And some captions. That's all I can muster right now.

 Bath, before and after. See if you can guess which is which! My best clue for you is that there's no Homart plastic tiles in the restored bathroom. Or pink. I'm not a pink person.
Here's the Original Medicine Cabinet, the one I bragged about finding so long ago, in her almost completed state (note the smears of wood filler). All installed, but not really finished yet. I'm putting off the rest of the paintjob until I get time to pull and strip (or replace with chrome copies) the hardware. The existing stuff is brass and would look ... odd, with the rest of the bath hardware being chrome.

Look, that's food in the kitchen, and not tools! Okay, some of those are tools, but mostly it's actual kitchen stuff. We can cook in here now, as of about a week ago. The first week, though, it was pretty grim, and we didn't get the tools packed of to the cellar until we were nearly starving for a lack of cooking space.

And, as promised, an image of (part of) the Giant Bed. It really does barely fit in the expanded master bedroom. This was the best picture I could get, as it's what was framed in the door. That's the baby napping on the bed, he gets his crib tomorrow. It's huge.

I will close with an image of the no-longer-hellish dining room ceiling, with the pretty, new, unfinished, "beam" for all to see. The real beam is actually much further up in the wall, and the posts against the walls are as cosmetic as the cladding over where the beam ought to be cosmetically (structurally, it's fine where it is). Don't look at the piles of boxes, please. Just pretend they aren't there.
That's what we do.
Sunday, December 10, 2006
Grout and About
We've taken a hill, in our overall battle for the house. It took us nearly all night, but we stand atop this rise and can see the remaining ground ahead. We're that much closer to being able to move in, because, really, a functional bathroom is an admittedly necessary thing. Almost as much as heat.
After much trial and tribulation (every battery for the two drills was in need of charging, we had to mix the grout partially by hand, and really, where do you stand when sponging a floor you just grouted?), we finally finished grouting the bathroom at 1 am. We also finished the plumbing - almost. The toilet works, the sink works (after a last minute mad dash to Lowe's, an hour away, last night), even most of the plumbing involved with the bath itself is functional. However, there is, as anyone else who also chose the self-punishing road of home renovation will expect to hear, one part missing. That one part, typically, is something Utterly Crucial, i.e, the threaded connector that serves to attach the tub faucet to the otherwise hideous and unattractive pipe.
At this point, we now have all the necessary things done. Much of what's left to do can be worked on after we move in, if need be. We are, realistically, two workdays (paint, plaster, tape and spackle, and maybe stripping the rest of the bedroom walls), and a cleanup day away from moving in. Christmas is now a realistic goal.
We find out next week when Chris goes. I hope we do get moved in before then.
After much trial and tribulation (every battery for the two drills was in need of charging, we had to mix the grout partially by hand, and really, where do you stand when sponging a floor you just grouted?), we finally finished grouting the bathroom at 1 am. We also finished the plumbing - almost. The toilet works, the sink works (after a last minute mad dash to Lowe's, an hour away, last night), even most of the plumbing involved with the bath itself is functional. However, there is, as anyone else who also chose the self-punishing road of home renovation will expect to hear, one part missing. That one part, typically, is something Utterly Crucial, i.e, the threaded connector that serves to attach the tub faucet to the otherwise hideous and unattractive pipe.
At this point, we now have all the necessary things done. Much of what's left to do can be worked on after we move in, if need be. We are, realistically, two workdays (paint, plaster, tape and spackle, and maybe stripping the rest of the bedroom walls), and a cleanup day away from moving in. Christmas is now a realistic goal.
We find out next week when Chris goes. I hope we do get moved in before then.
Wednesday, December 06, 2006
Scraping, Scraping, Scraping
The master bedroom is nearly denuded of its many layers of Vile Old Paper. Some of it, say, the gray-and-pearl stripe with its coordinating ceiling paper and edgings, was okay (not my taste, but tolerable), but others were emphatically NOT. Let's just say that I really don't think that Mrs. Songer (2nd owner of the home, from whose life most of the wallpapers date - the renters in the 40's may have papered too, but the Whites mostly painted, before the panelling went up) and I would have agreed on any decorating decisions. I am especially unfond of the mint-icecream colored floral stripe dating from the 1930's and its posy borders. Made me feel like I was in a perfume box, just looking at it, and I reminded myself that it was the choice of an older widowed lady.
I still like the ochre that the Wolfes painted the bedrooms originally, even if it also covers the ceiling, making it an oppressive color choice. I liked their paper in the dining room and hallway. We're not going with that color scheme, though. The bedroom will be gray, a soft, cloudlike, cool gray, with a coordinating sandtexture painted ceiling and a blue stripe at wallpaper-border level around the room.
We are returning to the Hell of Vile Paper Shreds momentarily, to continue our labors. Surely we must have painted over old wallpaper in some past life to have earned this suffering. O! See How I Lament! Perhaps if I do enough of this in this life, I will never have to do it again.
My happy place for this work is the vision of the soft grey room in which I will sleep, in our overpoweringly large bed with its new curtains. So calming. Our bed really isn't quite so large, but it's close enough to pretend that we have that bed.
Also, the heat isn't on yet. We wanted to get the soaking and scraping done with first, before we dry out the house too much. Hurrah for wrongheaded prioritizing!
I still like the ochre that the Wolfes painted the bedrooms originally, even if it also covers the ceiling, making it an oppressive color choice. I liked their paper in the dining room and hallway. We're not going with that color scheme, though. The bedroom will be gray, a soft, cloudlike, cool gray, with a coordinating sandtexture painted ceiling and a blue stripe at wallpaper-border level around the room.
We are returning to the Hell of Vile Paper Shreds momentarily, to continue our labors. Surely we must have painted over old wallpaper in some past life to have earned this suffering. O! See How I Lament! Perhaps if I do enough of this in this life, I will never have to do it again.
My happy place for this work is the vision of the soft grey room in which I will sleep, in our overpoweringly large bed with its new curtains. So calming. Our bed really isn't quite so large, but it's close enough to pretend that we have that bed.
Also, the heat isn't on yet. We wanted to get the soaking and scraping done with first, before we dry out the house too much. Hurrah for wrongheaded prioritizing!
Sunday, October 08, 2006
More tile!
I spent several hours in the bathroom yesterday, and we are now at 75% tiled. I had to go back to mom's to feed the wee one, or I'd have kept going.
The end is distantly in sight.
The end is distantly in sight.
Sunday, September 10, 2006
Progressions, Plans and a Thing In The Attic
So, it's Autumn, we've owned our home for 6 months (only 6? it feels like an eternity), and we've made some small progress. There's paint in the hallway now, a "Very Craftsman" green, according to Mom, and I'm working my way around the dining room. We've got all the floors clean of hideous carpet, though some are a little scarred from the experience. The living room is done, save for scouring the floor to remove the last of the carpet pad, and I've got a lovely play area set up for my older son to use while we work. The bath is half tiled, and the master bedroom still languishes, but at least there's a light in there. Things are moving along, if slowly.
I'm aiming for Hallowe'en as our move-in goal.
I have made some sketches of what I'm doing with parts of the house. My plan for the dining room bay is to take this:
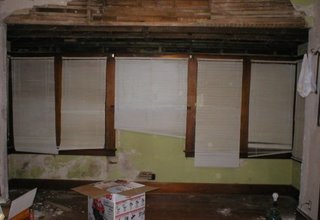
The dining room bay as it appears now.
And turn it into this:
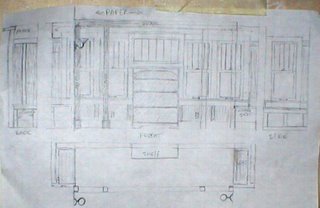
I made the sketch without looking at the bay so I misdrew the windows - they actually cover the full width of the bay. Other than that, it's spot on. The posts are structural, not just cosmetic. They will support the poorly-remodeled wall cutout on a 4x4 beam, and we've got plenty of mouldings to wrap them with, to make them look Really Original. Eventually, I'd like to add cosmetic ceiling beams to the dining room, too, but this comes first.
The bookshelf is actually a family heirloom, which belonged to my paternal grandmother. It's going to be mounted permanently to the wall, and there will be wainscot added around it, right up to the vertical posts at the corners. It'll be the same as the panelling in the "built-in" I made to fill the arch.
The window seats will be made of the salvageable parts of the old living room archway double doors, which apparently sat unloved for many years in some leaky place. The bottoms have completely rotted, leaving me with a nifty, but not reusable, item. I decided (since I can't replace them where they belong, and because I want to make them again a part of the house), to make window seats of them. Also, the bay is only 4 feet wide, the ends are not evenly deep, and that space is nearly wasted. Finally, it is because I have really fond memories of the enormous window seat in the dining room of my parents' craftsman bungalow when I was a kid. Nothing like curling up in a sunny window with a good book. I want my kids to have that.
Speaking of kids, I'm still working on FX's room. When last I posted about it, we were here:
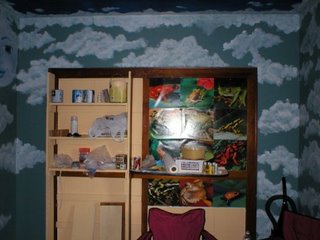 There are a few more shelves in the bookshelf, but it pretty much still looks this way now.
And we (which really means "I") plan to finish it thusly:
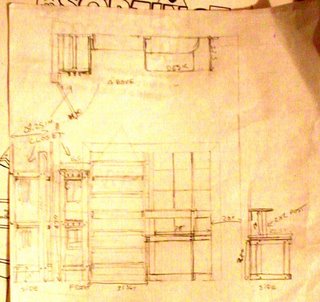
That's going to be an open closet with coat hooks on the outside, and shelves for shoes. The closet will have an upper and lower level, the upper one being for things he wears every once in a while (Sunday or seasonal clothes) and the lower being for his school clothes. The desk in the plans is all cut out, but not assembled.
Now to the progress. Quite a bit has been done, some has even been reported, none has been photographed ... Until now!
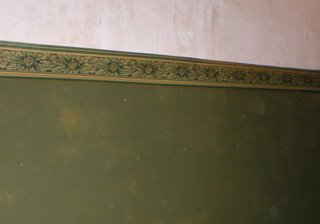 The Very Craftsman Green hallway.
That's just bare old plaster above the border. The frieze paper (really only by virtue of position - its only pattern is a sort of golden parchment look) goes up after the whole dining room and hallway are painted, and really will look more like an intended plaster finish similar to what's there now, but without the obvious patches and old mucilage. I love how the border paper looks, even if it's only tacked up.
The dark green will make a lovely background for two paintings, done by my cousin, that I was given. You can see one if them in the photo of the living room:
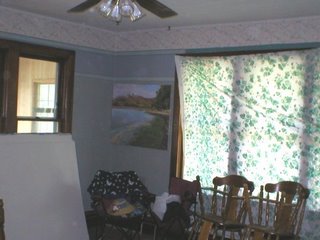 It'll be nice when there's furniture in it. Not lawn furniture.
I love that vintage Greek key paper, but there wasn't quite enough. I have to make some more, which will involve printing it on archival quality paper and pasting it up. It's always something :)
Now, the floor. Here, you can see the line of demarcation between the dining room and living room where the two different carpets once laid edge-to-edge:
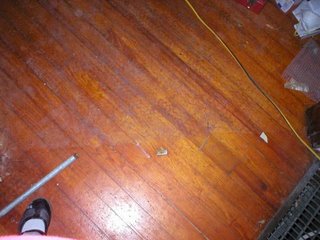 Seamy, Isn't it?
Yes, I figure they didn't strip off the old wax prior to laying down a pink rubber carpet pad however umpteen years ago, so when the pad degraded, it bonded to the old wax, leaving ... this. This is after scraping for two days. I'll keep you posted on the scrubbing and what works. Once it's scrubbed, I'm waxing it.
Call me old-fashioned, or call me masochistic - we do have 2 kids and a dog - I like waxed floors, even if I know what it takes to keep them up.
And now for the playroom:
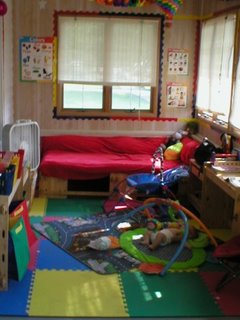
It's not perfect, but it's a nice, bright, stimulating environment for a 3 year old boy. And he loves it, which is what counts.
On to the half-tiled bath. First, a before picture is in order:

Now, we have this:
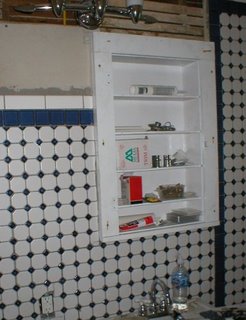 That's the "fixture wall" with the new/old medicine cabinet in it, sans door.
We were lucky enough to find the old girl under the dining room bay, and she's sound, so I painted her and in she went. The mirrored door is in the kitchen until we're all done flinging heavy stuff around in the bathroom. I wish I had time to finish in there right now, but I don't.
And the master bedroom currently houses all the salvaged lumber, mouldings, doors and panelling:
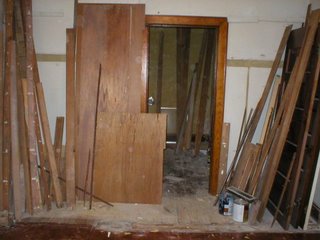 Sad, isn't it? Eventually, we will have to sleep in here.
Finally, we come to The Thing in the Attic:
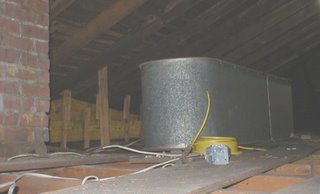 The Titanic, or our cistern.
A few months back, when I wasn't allowed up on ladders, my friend K stuck her head up in the attic where her husband J had been working to look for a tool we needed (we were demoing something), and said: "Hey! There's some kind of wash tub up here!"
I, of course, pictured a round tin tub, with handles, like the sort that get sold for icing down beers, and thought "Cool! I could use that for something."
Many weeks later, I stick my own head up there and see this HUGE bathtub shaped thing, about 4 feet wide and maybe 8 or 9 feet long, and a good 4 feet high. It must be the old water-pressurizing cistern, and must have been in here since the place was built. The way these things worked was that you'd pump water up here from the well, by hand, and it would sit up here until you turned on the taps, which would give you water pressure, like a water tower. It certainly goes a long way toward explaining some of the odd plumbing in the basement.
Now, what are we going to do with it if we ever decide to finish the attic?
I'm aiming for Hallowe'en as our move-in goal.
I have made some sketches of what I'm doing with parts of the house. My plan for the dining room bay is to take this:

The dining room bay as it appears now.
And turn it into this:
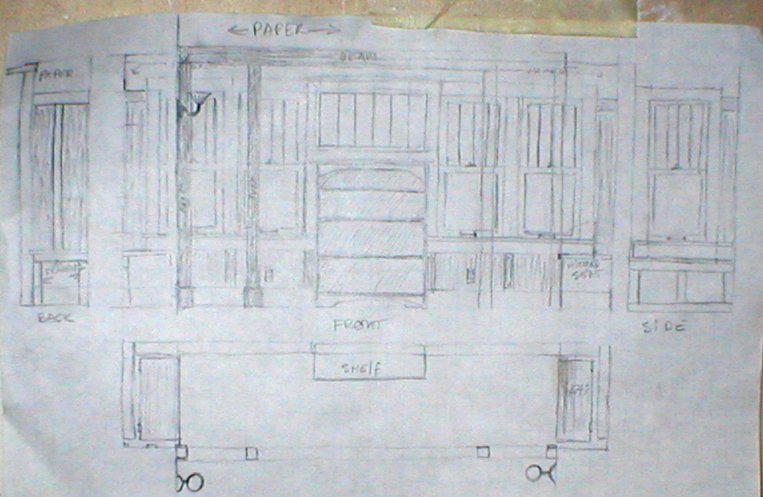
I made the sketch without looking at the bay so I misdrew the windows - they actually cover the full width of the bay. Other than that, it's spot on. The posts are structural, not just cosmetic. They will support the poorly-remodeled wall cutout on a 4x4 beam, and we've got plenty of mouldings to wrap them with, to make them look Really Original. Eventually, I'd like to add cosmetic ceiling beams to the dining room, too, but this comes first.
The bookshelf is actually a family heirloom, which belonged to my paternal grandmother. It's going to be mounted permanently to the wall, and there will be wainscot added around it, right up to the vertical posts at the corners. It'll be the same as the panelling in the "built-in" I made to fill the arch.
The window seats will be made of the salvageable parts of the old living room archway double doors, which apparently sat unloved for many years in some leaky place. The bottoms have completely rotted, leaving me with a nifty, but not reusable, item. I decided (since I can't replace them where they belong, and because I want to make them again a part of the house), to make window seats of them. Also, the bay is only 4 feet wide, the ends are not evenly deep, and that space is nearly wasted. Finally, it is because I have really fond memories of the enormous window seat in the dining room of my parents' craftsman bungalow when I was a kid. Nothing like curling up in a sunny window with a good book. I want my kids to have that.

Speaking of kids, I'm still working on FX's room. When last I posted about it, we were here:
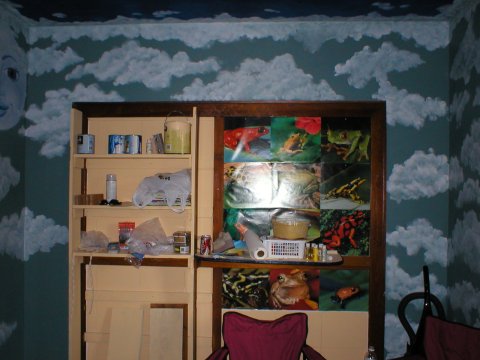 There are a few more shelves in the bookshelf, but it pretty much still looks this way now.
And we (which really means "I") plan to finish it thusly:
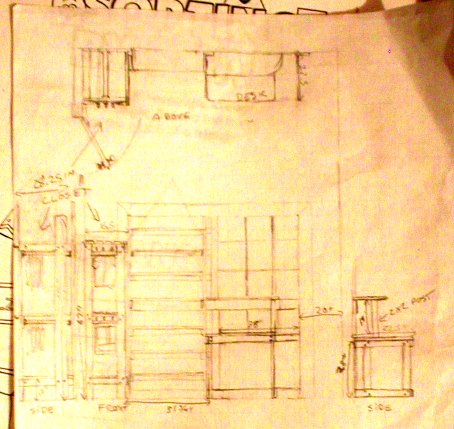
That's going to be an open closet with coat hooks on the outside, and shelves for shoes. The closet will have an upper and lower level, the upper one being for things he wears every once in a while (Sunday or seasonal clothes) and the lower being for his school clothes. The desk in the plans is all cut out, but not assembled.
Now to the progress. Quite a bit has been done, some has even been reported, none has been photographed ... Until now!
 The Very Craftsman Green hallway.
That's just bare old plaster above the border. The frieze paper (really only by virtue of position - its only pattern is a sort of golden parchment look) goes up after the whole dining room and hallway are painted, and really will look more like an intended plaster finish similar to what's there now, but without the obvious patches and old mucilage. I love how the border paper looks, even if it's only tacked up.
The dark green will make a lovely background for two paintings, done by my cousin, that I was given. You can see one if them in the photo of the living room:
 It'll be nice when there's furniture in it. Not lawn furniture.
I love that vintage Greek key paper, but there wasn't quite enough. I have to make some more, which will involve printing it on archival quality paper and pasting it up. It's always something :)
Now, the floor. Here, you can see the line of demarcation between the dining room and living room where the two different carpets once laid edge-to-edge:
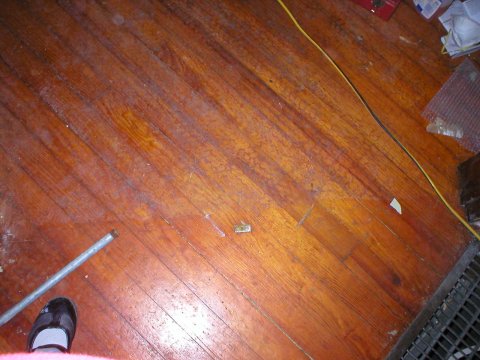 Seamy, Isn't it?
Yes, I figure they didn't strip off the old wax prior to laying down a pink rubber carpet pad however umpteen years ago, so when the pad degraded, it bonded to the old wax, leaving ... this. This is after scraping for two days. I'll keep you posted on the scrubbing and what works. Once it's scrubbed, I'm waxing it.
Call me old-fashioned, or call me masochistic - we do have 2 kids and a dog - I like waxed floors, even if I know what it takes to keep them up.
And now for the playroom:
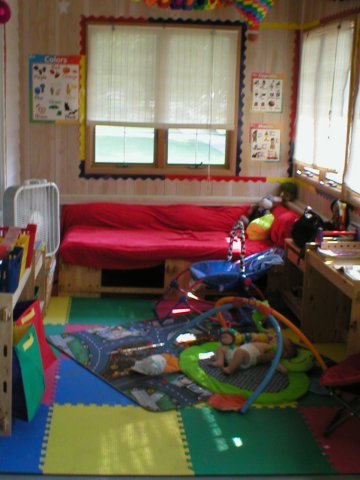
It's not perfect, but it's a nice, bright, stimulating environment for a 3 year old boy. And he loves it, which is what counts.
On to the half-tiled bath. First, a before picture is in order:

Now, we have this:
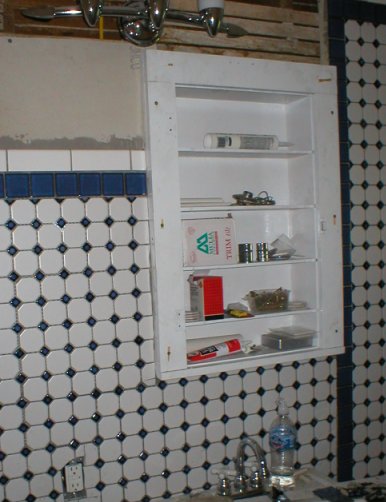 That's the "fixture wall" with the new/old medicine cabinet in it, sans door.
 We were lucky enough to find the old girl under the dining room bay, and she's sound, so I painted her and in she went. The mirrored door is in the kitchen until we're all done flinging heavy stuff around in the bathroom. I wish I had time to finish in there right now, but I don't.
And the master bedroom currently houses all the salvaged lumber, mouldings, doors and panelling:
 Sad, isn't it? Eventually, we will have to sleep in here.
Finally, we come to The Thing in the Attic:
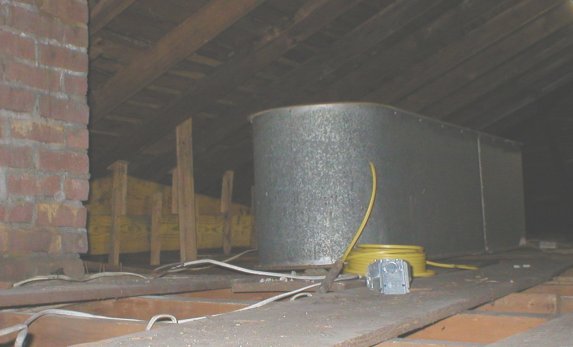 The Titanic, or our cistern.
A few months back, when I wasn't allowed up on ladders, my friend K stuck her head up in the attic where her husband J had been working to look for a tool we needed (we were demoing something), and said: "Hey! There's some kind of wash tub up here!"
I, of course, pictured a round tin tub, with handles, like the sort that get sold for icing down beers, and thought "Cool! I could use that for something."
Many weeks later, I stick my own head up there and see this HUGE bathtub shaped thing, about 4 feet wide and maybe 8 or 9 feet long, and a good 4 feet high. It must be the old water-pressurizing cistern, and must have been in here since the place was built. The way these things worked was that you'd pump water up here from the well, by hand, and it would sit up here until you turned on the taps, which would give you water pressure, like a water tower. It certainly goes a long way toward explaining some of the odd plumbing in the basement.
Now, what are we going to do with it if we ever decide to finish the attic?
Sunday, May 14, 2006
Pictures, and progress.
Or is that "Pictures of Progress?" I'm not sure. Anyhow, here are some images of what I've been ranting about recently. Updates to my in-progress phots are here.
First, I was talking about filling in the open archway between what had been originally intended as a den and the dining room, so that my son could have some privacy (and so that we could make use of otherwise wasted space). I wanted to do something really Stickley-style, like a fabulous built-in. We really don't have the money for that and all the other things we need to do first, so I had to figure out how to do this in a sympathetic, period looking style without spending any real money, as well as doing a temporary thing.
Why temporary? Well, in five or so years, we plan to have two bedrooms and a bath built in the cellar, for the boys, as well as a completely finished laundry room, workspace, and finsihed storage areas. When that happens, we can turn our den back into a den, and I'd like to be able to put in abbreviated Craftsman-style cabinets with square pillars inside that archway. So anything we do now is just set dressing.
Here's the before pic, with the PO's non-sympathetic solution (vinyl accordion curtains):

This is taken from the dining room, looking west into the den (my son's bedroom). Not pretty, but it worked for the PO, an elderly woman in need of constant care.
Now, a series of on-the-way-to-after pictures, taken from the same vantage point:


This is a demo-in-progress image of the dining room bay addition. It's slightly less ugly right now, but we have some fairly major work to do here. First, we are going to put in posts and a support beam, as you can see some bowing where the bay was cut into the wall. There will be four posts, two at the ends, mounted flush to the walls, and two set in about 2' from the ends to create an open but divided space. There will be wainscot panels done in the same style as the archway fill-in in the bay, from the corners and under the windows, a built-in bookshelf under the center short window, and I'm going to build two window seats into the otherwise wasted space in the ends of the bay as well. I think this will all work together with the built-in panel in the arch, to increase the "Craftsman" feel of the house. I see a larger can of Minwax Polyshades in my future.
Now for the view from my son's room:


These are all shots of the part of the paintjob that had to be done before I could get back to cutting and screwing things up ... er ... together. There will be clouds painted on the walls, and the ceiling will be a deeper, more vibrant blue with stars and a moon on it. I'm debating painting in a wainscot strip with related, A&C type elements. That will probably depend on the time available before we move in.
And, I still need a radio. The talking to myself is really out of hand. I've been talking to my tools ... more than usual.
First, I was talking about filling in the open archway between what had been originally intended as a den and the dining room, so that my son could have some privacy (and so that we could make use of otherwise wasted space). I wanted to do something really Stickley-style, like a fabulous built-in. We really don't have the money for that and all the other things we need to do first, so I had to figure out how to do this in a sympathetic, period looking style without spending any real money, as well as doing a temporary thing.
Why temporary? Well, in five or so years, we plan to have two bedrooms and a bath built in the cellar, for the boys, as well as a completely finished laundry room, workspace, and finsihed storage areas. When that happens, we can turn our den back into a den, and I'd like to be able to put in abbreviated Craftsman-style cabinets with square pillars inside that archway. So anything we do now is just set dressing.
Here's the before pic, with the PO's non-sympathetic solution (vinyl accordion curtains):

This is taken from the dining room, looking west into the den (my son's bedroom). Not pretty, but it worked for the PO, an elderly woman in need of constant care.
Now, a series of on-the-way-to-after pictures, taken from the same vantage point:


This is a demo-in-progress image of the dining room bay addition. It's slightly less ugly right now, but we have some fairly major work to do here. First, we are going to put in posts and a support beam, as you can see some bowing where the bay was cut into the wall. There will be four posts, two at the ends, mounted flush to the walls, and two set in about 2' from the ends to create an open but divided space. There will be wainscot panels done in the same style as the archway fill-in in the bay, from the corners and under the windows, a built-in bookshelf under the center short window, and I'm going to build two window seats into the otherwise wasted space in the ends of the bay as well. I think this will all work together with the built-in panel in the arch, to increase the "Craftsman" feel of the house. I see a larger can of Minwax Polyshades in my future.
Now for the view from my son's room:


These are all shots of the part of the paintjob that had to be done before I could get back to cutting and screwing things up ... er ... together. There will be clouds painted on the walls, and the ceiling will be a deeper, more vibrant blue with stars and a moon on it. I'm debating painting in a wainscot strip with related, A&C type elements. That will probably depend on the time available before we move in.
And, I still need a radio. The talking to myself is really out of hand. I've been talking to my tools ... more than usual.
Monday, May 08, 2006
Recycling = more beauty from ugliness
And it's almost free! If you don't count my time spent, that is. As I'm not gainfully employed at this time -there being no payscale for mothering- I'm not counting it. I'm literally making beauty out of ugly things, not just patching or covering it up, so I've got that to be happy about too.
I needed to create a fill-in between the den (which will become my older son's room) and the dining room, inside an arch, in such a way that it can be removed later but also in such a way that it looks like a built-in or other deliberate design element. The arch had already had awful vinyl accordion curtains screwed into it, which we reomved, so attaching a framework inside it was not going to create any more damage or future work. That was the easy part. It took about 3 hours, including measuring and cutting, and sifting through the demo'd out 2x4s from the old 70's drop ceiling for good lumber. Recycling phase 1.
Once I had the framework in, I stood around puzzling about what I wanted to cover it with. I looked over the hideous fake wood paneling we had ripped out, and noticed that the backs of the sheets (those not badly damaged or befouled by glue) were actually quite attractive, if I sanded off the product information stamps. I selected the two most attractive, cut them to size and tacked them up. Recycling phase 2.
Now what? "It looks like a big doorway with fairly nice plywood tacked across it. Hmmm. Better, but not the look I want." Thinking ensued. Some of those old furring strips were nice and smooth on one side, and if I pulled out all the staples and nails and scraps of polystyrene tile, might just sand up to something tolerable. Oh, and we did have lots of original salvaged mouldings of various types from demo'ing the old closet wall and making our bedroom large enough to use. Some of those looked promising. Like the casing from the closet doorway...
I sat on the floor after assembling all the likely pieces of wood and thought intently, then decided to go buy myself a drink. Not alcoholic, though I have certainly thought about that enough, between the house and general other drama. However, as Miller Time isn't for another month and a half, I must needs wait.
Back from my jaunt, I cleaned up enough furring strips to make vertical trim pieces on my new paneled wall, Craftsman-Style. I set a baseboard in, measured from there to where I wanted the "chair rail" (more like armpit rail...), and got out my handy wee saw. Then, with all five trim parts cut, I became distracted by a good idea. "Hey! What this needs is a mirror!" As we had one that had been hung on the bathroom door, that was actually less of a leap than you'd think.
Of course, now I had to figure out how to frame the thing. Originally I had meant to just use furring strips for all the trim, horizontal and vertical, but adding the complication of a built-in, framed mirror made that less than workable. Back to the casing from the closet door that was no more. Hmmm. Inside the closet, the casings hadn't been stained, but outside, they had, so I had some pre-matched mouldings to work with on my fakey-craftsman "built-in" piece. I think there may even have been a lightbulb hanging above my head. More measuring and cutting ensued, with me pulling the mirror down, measuring it, forgetting the measurements, and running back and forth between the mirror and my improvised sawhorses.
Eventually, I got the framing mouldings cut, and notched correctly for the mirror, and hung on my false wall. I even remembered to put the mirror in before it was all tacked up, and there was only one episode of not-measuring-correctly in the middle of it all. Recycling phase 3 was now complete.
Today, I got a wild hair to add a shelf above the mirror, before measuring and cutting the last several furring strip trim pieces, and that's what I did. There was a great deal of swearing involved, as I really needed more hands to do this, but the result looks good. I made that out of most of the old knicknack shelf the PO's dad had made 30-some years ago, plus the mitered offcuts of the door casings. Recycling phase 4.
Of course, there are no pictures. There likely won't be until the thing is all assembled, possibly not until it's all stained and shiny, depending on whether or not I can be bothered to remember the camera. Hopefully my gestating offspring hasn't absorbed my very blue vocal expressions (also known in my family as "Carpentry English") too terribly much today.
And, yes, I still need a radio. The crazy is getting distinctly ... crazy.
I needed to create a fill-in between the den (which will become my older son's room) and the dining room, inside an arch, in such a way that it can be removed later but also in such a way that it looks like a built-in or other deliberate design element. The arch had already had awful vinyl accordion curtains screwed into it, which we reomved, so attaching a framework inside it was not going to create any more damage or future work. That was the easy part. It took about 3 hours, including measuring and cutting, and sifting through the demo'd out 2x4s from the old 70's drop ceiling for good lumber. Recycling phase 1.
Once I had the framework in, I stood around puzzling about what I wanted to cover it with. I looked over the hideous fake wood paneling we had ripped out, and noticed that the backs of the sheets (those not badly damaged or befouled by glue) were actually quite attractive, if I sanded off the product information stamps. I selected the two most attractive, cut them to size and tacked them up. Recycling phase 2.
Now what? "It looks like a big doorway with fairly nice plywood tacked across it. Hmmm. Better, but not the look I want." Thinking ensued. Some of those old furring strips were nice and smooth on one side, and if I pulled out all the staples and nails and scraps of polystyrene tile, might just sand up to something tolerable. Oh, and we did have lots of original salvaged mouldings of various types from demo'ing the old closet wall and making our bedroom large enough to use. Some of those looked promising. Like the casing from the closet doorway...
I sat on the floor after assembling all the likely pieces of wood and thought intently, then decided to go buy myself a drink. Not alcoholic, though I have certainly thought about that enough, between the house and general other drama. However, as Miller Time isn't for another month and a half, I must needs wait.
Back from my jaunt, I cleaned up enough furring strips to make vertical trim pieces on my new paneled wall, Craftsman-Style. I set a baseboard in, measured from there to where I wanted the "chair rail" (more like armpit rail...), and got out my handy wee saw. Then, with all five trim parts cut, I became distracted by a good idea. "Hey! What this needs is a mirror!" As we had one that had been hung on the bathroom door, that was actually less of a leap than you'd think.
Of course, now I had to figure out how to frame the thing. Originally I had meant to just use furring strips for all the trim, horizontal and vertical, but adding the complication of a built-in, framed mirror made that less than workable. Back to the casing from the closet door that was no more. Hmmm. Inside the closet, the casings hadn't been stained, but outside, they had, so I had some pre-matched mouldings to work with on my fakey-craftsman "built-in" piece. I think there may even have been a lightbulb hanging above my head. More measuring and cutting ensued, with me pulling the mirror down, measuring it, forgetting the measurements, and running back and forth between the mirror and my improvised sawhorses.
Eventually, I got the framing mouldings cut, and notched correctly for the mirror, and hung on my false wall. I even remembered to put the mirror in before it was all tacked up, and there was only one episode of not-measuring-correctly in the middle of it all. Recycling phase 3 was now complete.
Today, I got a wild hair to add a shelf above the mirror, before measuring and cutting the last several furring strip trim pieces, and that's what I did. There was a great deal of swearing involved, as I really needed more hands to do this, but the result looks good. I made that out of most of the old knicknack shelf the PO's dad had made 30-some years ago, plus the mitered offcuts of the door casings. Recycling phase 4.
Of course, there are no pictures. There likely won't be until the thing is all assembled, possibly not until it's all stained and shiny, depending on whether or not I can be bothered to remember the camera. Hopefully my gestating offspring hasn't absorbed my very blue vocal expressions (also known in my family as "Carpentry English") too terribly much today.
And, yes, I still need a radio. The crazy is getting distinctly ... crazy.
Subscribe to:
Posts (Atom)