Showing posts with label salvage. Show all posts

Sunday, September 10, 2006

Progressions, Plans and a Thing In The Attic

So, it's Autumn, we've owned our home for 6 months (only 6? it feels like an eternity), and we've made some small progress. There's paint in the hallway now, a "Very Craftsman" green, according to Mom, and I'm working my way around the dining room. We've got all the floors clean of hideous carpet, though some are a little scarred from the experience. The living room is done, save for scouring the floor to remove the last of the carpet pad, and I've got a lovely play area set up for my older son to use while we work. The bath is half tiled, and the master bedroom still languishes, but at least there's a light in there. Things are moving along, if slowly.

I'm aiming for Hallowe'en as our move-in goal.

I have made some sketches of what I'm doing with parts of the house. My plan for the dining room bay is to take this:
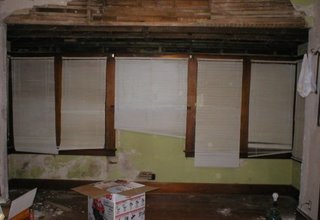
hideous before picture
The dining room bay as it appears now.

And turn it into this:
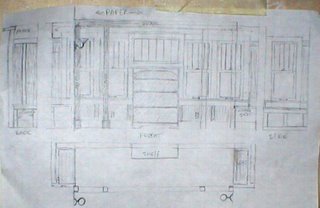
Bay Plans

I made the sketch without looking at the bay so I misdrew the windows - they actually cover the full width of the bay. Other than that, it's spot on. The posts are structural, not just cosmetic. They will support the poorly-remodeled wall cutout on a 4x4 beam, and we've got plenty of mouldings to wrap them with, to make them look Really Original. Eventually, I'd like to add cosmetic ceiling beams to the dining room, too, but this comes first.

The bookshelf is actually a family heirloom, which belonged to my paternal grandmother. It's going to be mounted permanently to the wall, and there will be wainscot added around it, right up to the vertical posts at the corners. It'll be the same as the panelling in the "built-in" I made to fill the arch.

The window seats will be made of the salvageable parts of the old living room archway double doors, which apparently sat unloved for many years in some leaky place. The bottoms have completely rotted, leaving me with a nifty, but not reusable, item. I decided (since I can't replace them where they belong, and because I want to make them again a part of the house), to make window seats of them. Also, the bay is only 4 feet wide, the ends are not evenly deep, and that space is nearly wasted. Finally, it is because I have really fond memories of the enormous window seat in the dining room of my parents' craftsman bungalow when I was a kid. Nothing like curling up in a sunny window with a good book. I want my kids to have that.

Speaking of kids, I'm still working on FX's room. When last I posted about it, we were here:
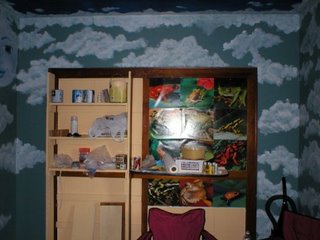
boy's room built-inThere are a few more shelves in the bookshelf, but it pretty much still looks this way now.

And we (which really means "I") plan to finish it thusly:
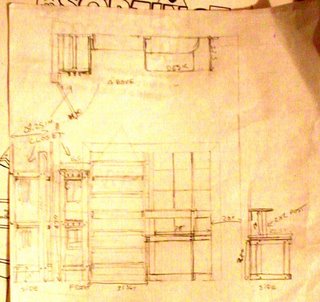
Plans! Such plans we have!

That's going to be an open closet with coat hooks on the outside, and shelves for shoes. The closet will have an upper and lower level, the upper one being for things he wears every once in a while (Sunday or seasonal clothes) and the lower being for his school clothes. The desk in the plans is all cut out, but not assembled.

Now to the progress. Quite a bit has been done, some has even been reported, none has been photographed ... Until now!
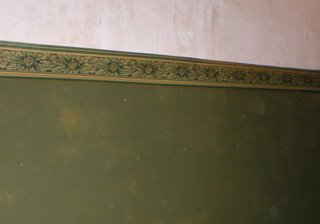
The Very Craftsman Green hallwayThe Very Craftsman Green hallway.

That's just bare old plaster above the border. The frieze paper (really only by virtue of position - its only pattern is a sort of golden parchment look) goes up after the whole dining room and hallway are painted, and really will look more like an intended plaster finish similar to what's there now, but without the obvious patches and old mucilage. I love how the border paper looks, even if it's only tacked up.

The dark green will make a lovely background for two paintings, done by my cousin, that I was given. You can see one if them in the photo of the living room:
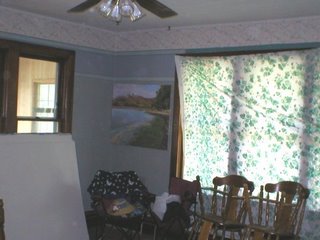
It'll be nice when there's furniture in it. Not lawn furniture.It'll be nice when there's furniture in it. Not lawn furniture.

I love that vintage Greek key paper, but there wasn't quite enough. I have to make some more, which will involve printing it on archival quality paper and pasting it up. It's always something :)

Now, the floor. Here, you can see the line of demarcation between the dining room and living room where the two different carpets once laid edge-to-edge:
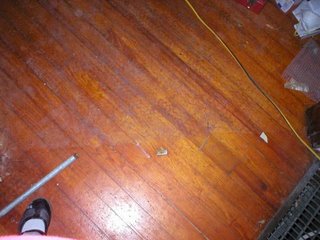
Seamy, isn't it?Seamy, Isn't it?

Yes, I figure they didn't strip off the old wax prior to laying down a pink rubber carpet pad however umpteen years ago, so when the pad degraded, it bonded to the old wax, leaving ... this. This is after scraping for two days. I'll keep you posted on the scrubbing and what works. Once it's scrubbed, I'm waxing it.

Call me old-fashioned, or call me masochistic - we do have 2 kids and a dog - I like waxed floors, even if I know what it takes to keep them up.

And now for the playroom:
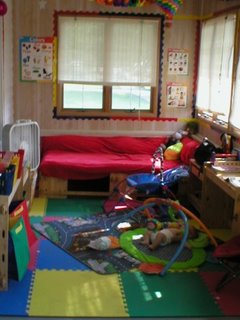
Playroom

It's not perfect, but it's a nice, bright, stimulating environment for a 3 year old boy. And he loves it, which is what counts.

On to the half-tiled bath. First, a before picture is in order:


It was very pink, and plastic, in there.

Now, we have this:
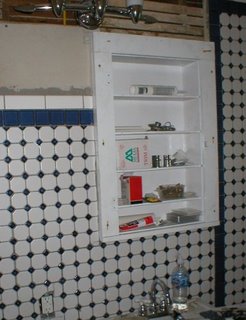
tiled wall with medicine cabinetThat's the "fixture wall" with the new/old medicine cabinet in it, sans door.

We were lucky enough to find the old girl under the dining room bay, and she's sound, so I painted her and in she went. The mirrored door is in the kitchen until we're all done flinging heavy stuff around in the bathroom. I wish I had time to finish in there right now, but I don't.

And the master bedroom currently houses all the salvaged lumber, mouldings, doors and panelling:
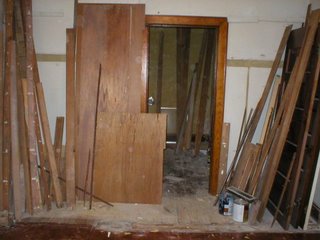
piles of wood!Sad, isn't it? Eventually, we will have to sleep in here.

Finally, we come to The Thing in the Attic:
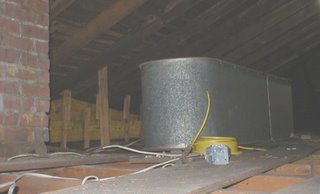
The Titanic, or our cistern.The Titanic, or our cistern.

A few months back, when I wasn't allowed up on ladders, my friend K stuck her head up in the attic where her husband J had been working to look for a tool we needed (we were demoing something), and said: "Hey! There's some kind of wash tub up here!"

I, of course, pictured a round tin tub, with handles, like the sort that get sold for icing down beers, and thought "Cool! I could use that for something."

Many weeks later, I stick my own head up there and see this HUGE bathtub shaped thing, about 4 feet wide and maybe 8 or 9 feet long, and a good 4 feet high. It must be the old water-pressurizing cistern, and must have been in here since the place was built. The way these things worked was that you'd pump water up here from the well, by hand, and it would sit up here until you turned on the taps, which would give you water pressure, like a water tower. It certainly goes a long way toward explaining some of the odd plumbing in the basement.

Now, what are we going to do with it if we ever decide to finish the attic?

Thursday, August 17, 2006

Powdered House

I finished demoing out the ceiling in the diningroom bay addition yesterday.

Me: "OH MY GOD. It's powder. This was a beam."

EMT J (as distinct from Wiring J): "Is that like cancer for a house?"

Me:"Yes. Hopefully, it's operable, and not terminal."

We discovered the dryrot. Lots of it. In a place I was hoping against hope wasn't dryrotted. And after I stopped swearing, I made a plan of attack.

There was a leak from the rain gutter, maybe 30 years ago, that was allowed to EAT AWAY THE SUPPORT MEMBERS of about a 2'x8' section of the bay roof. And the roofers who "fixed" it just put up a really heavy sheathing board over the hole (I'm guessing 1" ply, since I can SEE it through the approximately 2x1 foot ragged hole in the old tongue and groove sheathing). The 4x4 beam that runs across the face of the wall has been reduced to powder in one place, and to an uneven 1x4 in others. The crosspieces that allegedly rest on it are damaged, so they really more hang near it.

The bay is literally being held up by the roof sheathing resting on the house sheathing (thankfully, some hard wood in big planks, topped with good solid wood lap siding). Oh, and the windows, with their trim.

Shudder. SH@# F@#& D#^* M@&^*@#$^$@#!

So, we have a lot of yanking of trim and reframing to do, which puts us back a good week or two, optimistically. Last night, we bought a shopvac to "demo" the powdered wood with, plus some filter bags to catch the yuck. Today, we are off to buy the replacement lumber.

Good thing we already have a nice stash of salvaged 2x4's. We'll need them to build the temporary supports.

Sunday, August 06, 2006

Some progress, some regression, and some blessings counted.

I'm counting my blessings, lest I sink into despair. There will be no moving in this week. FX will come home to an unfinished house, even if he will have a play area to use while we work.

Why? We have fixtures in the bath now, and even some tile (Thanks, MOM!), but that's not really done yet. That's the progess. However, in the process of getting there, we discovered that the toilet we wanted to keep was Done For.

After re-installing it. Sigh. Off to the Home Improvement Store (this time it was Menard's) for a new toilet, a cheap new toilet, and other necessities. Unforseen spending later, (under 200 bucks, really, so we got out cheap, but it was still not budgeted for) there is, once again, a toilet in our new bathroom.

Well, if we have to move for any reason, we can advertise it as having "all new fixtures" in the bath. I don't want to move, this house has ahold of my soul.

Now to the livingroom carpet. Remember the carpet dream? Well, it was partially prophetic - that horrible carpet was on a pad that was either glued down or that degraded in a manner most foul. We've been scraping for two days, and we only have 1/3 of the floor exposed. I see refinishing in my future - but, at least, not sanding. Scrubbing, on hands and knees, and revarnishing, but no sanding in this room, at least.

Sunday, July 16, 2006

bathroom demo complete, plus bonus wound report

Look, the idiot is dancing again. But this time, she is limping.

The good news: the bath demo is done! The tiny tub (very HEAVY but also tiny) is out, and awaiting removal* in our otherwise empty living room. The appallingly designed, 1970's, also tiny (below crotch level on a small woman), sink vanity was ripped out (and destroyed) with glee yesterday. The sink and bath had a strange synergy going - the tub is a wave-front, streamline designed built-in tub, and the vanity was a flat-sided box that was installed rightupagainst the tub, leaving a little pocket between the head of the tub and the side of the vanity, where water and a half dozen washcloths had gathered over the years.

Not surprisingly, I had to rip out several punky floorboards, but the subfloor is very intact, which means that patching that spot on the floor before installing the tilebacker is going to be a piece of cake (all supply lines run through the wall, so no cutouts even need to be made!). Yuck, but fixable. AND - no termite damage, just old mold rot, which is now well dried out (the house was not lived in for 2 years before we bought it and we didn't use the tub or sink at all) and gone.

All the Vile Stinky Tile Adhesive came down with the plaster coat it had been attached to. The bare lath looks a heck of a lot better, and smells better too. Funny how much bigger the little room looks when it's empty...

We have elected to keep the old, high-flow toilet, as we like it, but it's getting pulled gently and set aside until the hardibacker is laid and skimmed.

The plumbing is demoed, too, so now we know what we need to get - and what we forgot to get. Like the tub overflow valve...and the drain pipe parts. Nothing quite like discovering you forgot to get something essential when elbows deep in a job. Sigh. We also have nowhere to go when working on the house. Well, I have nowhere to go. For the guys, there are plenty of trees in the backyard...

The bath wiring is also complete - J was putting in the two new GFI outlets as we left last night. The box for the wall fixture was put in, and the ceiling fixture was pulled out (even if it's nice, I really don't need to climb 9 feet up to screw around with a wet fixture to change bulbs in the middle of the night). The hole will probably end up holding a through-attic vent, since the enclosed back porch covers the only window.

That window opens, but it hinges open against the showerhead. The window predates any shower in that bath, so it's a matter of old laziness (I think the PPO, when they fixed the house up for sale in 1949). I say this as it is an easy fix - swap the hinges and latch from one side to the other. I want to pull and strip the hardware anyway, so why not fix this issue now?

We have also come to a decision about the 1940's - 1950's medicine cabinet - we're selling it. We'll put in either the original cabinet (found under the bay addition, and in need of restoration) or an equivalent repro. Craftsman-style wall cabinets are popular and can be had fairly cheaply these days, so it comes down to whichever is the less expensive option for now.

Now, we get to the limping part. I caught my shoe on a multi nailed scrap yesterday, and thinking I had shaken it off, put weight on my foot. No such luck - it had caught me and I got punctured. My foot HURTS, but the nail was a clean one, I've had a Tetanus shot in the past few years (in '99) and we have a first aid kit handy. My foot still hurts, though. I'll live.

* This gets mentioned last. My husband was theorizing yesterday about uses for the ex-tub. Like a fishpond, or planter. In the yard. I think he's pulling my chain. I hope he's pulling my chain. I'm all about reuse, but that's a little rednecky, even for me.

Here's an example of his sense of humor:


My advice? Don't sit on the smudged lid of a spackle can in black pants when he's around ... whether he has a camera or not.

Sunday, May 14, 2006

Pictures, and progress.

Or is that "Pictures of Progress?" I'm not sure. Anyhow, here are some images of what I've been ranting about recently. Updates to my in-progress phots are here.

First, I was talking about filling in the open archway between what had been originally intended as a den and the dining room, so that my son could have some privacy (and so that we could make use of otherwise wasted space). I wanted to do something really Stickley-style, like a fabulous built-in. We really don't have the money for that and all the other things we need to do first, so I had to figure out how to do this in a sympathetic, period looking style without spending any real money, as well as doing a temporary thing.

Why temporary? Well, in five or so years, we plan to have two bedrooms and a bath built in the cellar, for the boys, as well as a completely finished laundry room, workspace, and finsihed storage areas. When that happens, we can turn our den back into a den, and I'd like to be able to put in abbreviated Craftsman-style cabinets with square pillars inside that archway. So anything we do now is just set dressing.

Here's the before pic, with the PO's non-sympathetic solution (vinyl accordion curtains):


This is taken from the dining room, looking west into the den (my son's bedroom). Not pretty, but it worked for the PO, an elderly woman in need of constant care.

Now, a series of on-the-way-to-after pictures, taken from the same vantage point:


This is the built-in, mostly done. I think it looks fairly good, and is sympathetic enough to the original style of the house. It's naked, though.


This is halfway or so through staining it with Minwax Polyshades Satin in Old Maple. It looks like a good match, so far!


And this is the staining nearly complete, without the last trim pieces. I realized I'd have an easier time with the trim and stain if I stained the panel above the shelf, then applied and stained the trim sections. It still looks really good. I'm happy with is, and can hardly wait to see how the room looks all done.


This is a demo-in-progress image of the dining room bay addition. It's slightly less ugly right now, but we have some fairly major work to do here. First, we are going to put in posts and a support beam, as you can see some bowing where the bay was cut into the wall. There will be four posts, two at the ends, mounted flush to the walls, and two set in about 2' from the ends to create an open but divided space. There will be wainscot panels done in the same style as the archway fill-in in the bay, from the corners and under the windows, a built-in bookshelf under the center short window, and I'm going to build two window seats into the otherwise wasted space in the ends of the bay as well. I think this will all work together with the built-in panel in the arch, to increase the "Craftsman" feel of the house. I see a larger can of Minwax Polyshades in my future.

Now for the view from my son's room:


This is the built-in on his side, about half finished. For practical reasons, I'm having to alternate painting and finishing his built-in furniture. There will be a desk built below the single shelf that divides his frog mural, and in that corner that's full of salvaged lumber for the project, there will be an open "closet" with a shelf at top and bottom for more storage. I used two layers of salvaged acoustic tiles (pulled from the ceiling of the MB) to give him some soundproofing so we don't have to be super-quiet when he's asleep. They will also function as a bulletin board, where he can pin things up.


These are all shots of the part of the paintjob that had to be done before I could get back to cutting and screwing things up ... er ... together. There will be clouds painted on the walls, and the ceiling will be a deeper, more vibrant blue with stars and a moon on it. I'm debating painting in a wainscot strip with related, A&C type elements. That will probably depend on the time available before we move in.

And, I still need a radio. The talking to myself is really out of hand. I've been talking to my tools ... more than usual.

Monday, May 08, 2006

Recycling = more beauty from ugliness

And it's almost free! If you don't count my time spent, that is. As I'm not gainfully employed at this time -there being no payscale for mothering- I'm not counting it. I'm literally making beauty out of ugly things, not just patching or covering it up, so I've got that to be happy about too.

I needed to create a fill-in between the den (which will become my older son's room) and the dining room, inside an arch, in such a way that it can be removed later but also in such a way that it looks like a built-in or other deliberate design element. The arch had already had awful vinyl accordion curtains screwed into it, which we reomved, so attaching a framework inside it was not going to create any more damage or future work. That was the easy part. It took about 3 hours, including measuring and cutting, and sifting through the demo'd out 2x4s from the old 70's drop ceiling for good lumber. Recycling phase 1.

Once I had the framework in, I stood around puzzling about what I wanted to cover it with. I looked over the hideous fake wood paneling we had ripped out, and noticed that the backs of the sheets (those not badly damaged or befouled by glue) were actually quite attractive, if I sanded off the product information stamps. I selected the two most attractive, cut them to size and tacked them up. Recycling phase 2.

Now what? "It looks like a big doorway with fairly nice plywood tacked across it. Hmmm. Better, but not the look I want." Thinking ensued. Some of those old furring strips were nice and smooth on one side, and if I pulled out all the staples and nails and scraps of polystyrene tile, might just sand up to something tolerable. Oh, and we did have lots of original salvaged mouldings of various types from demo'ing the old closet wall and making our bedroom large enough to use. Some of those looked promising. Like the casing from the closet doorway...

I sat on the floor after assembling all the likely pieces of wood and thought intently, then decided to go buy myself a drink. Not alcoholic, though I have certainly thought about that enough, between the house and general other drama. However, as Miller Time isn't for another month and a half, I must needs wait.

Back from my jaunt, I cleaned up enough furring strips to make vertical trim pieces on my new paneled wall, Craftsman-Style. I set a baseboard in, measured from there to where I wanted the "chair rail" (more like armpit rail...), and got out my handy wee saw. Then, with all five trim parts cut, I became distracted by a good idea. "Hey! What this needs is a mirror!" As we had one that had been hung on the bathroom door, that was actually less of a leap than you'd think.

Of course, now I had to figure out how to frame the thing. Originally I had meant to just use furring strips for all the trim, horizontal and vertical, but adding the complication of a built-in, framed mirror made that less than workable. Back to the casing from the closet door that was no more. Hmmm. Inside the closet, the casings hadn't been stained, but outside, they had, so I had some pre-matched mouldings to work with on my fakey-craftsman "built-in" piece. I think there may even have been a lightbulb hanging above my head. More measuring and cutting ensued, with me pulling the mirror down, measuring it, forgetting the measurements, and running back and forth between the mirror and my improvised sawhorses.

Eventually, I got the framing mouldings cut, and notched correctly for the mirror, and hung on my false wall. I even remembered to put the mirror in before it was all tacked up, and there was only one episode of not-measuring-correctly in the middle of it all. Recycling phase 3 was now complete.

Today, I got a wild hair to add a shelf above the mirror, before measuring and cutting the last several furring strip trim pieces, and that's what I did. There was a great deal of swearing involved, as I really needed more hands to do this, but the result looks good. I made that out of most of the old knicknack shelf the PO's dad had made 30-some years ago, plus the mitered offcuts of the door casings. Recycling phase 4.

Of course, there are no pictures. There likely won't be until the thing is all assembled, possibly not until it's all stained and shiny, depending on whether or not I can be bothered to remember the camera. Hopefully my gestating offspring hasn't absorbed my very blue vocal expressions (also known in my family as "Carpentry English") too terribly much today.

And, yes, I still need a radio. The crazy is getting distinctly ... crazy.

Sunday, April 09, 2006

House Rehab Illustrated

I finally remembered to bring the camera. Included herein are images of the kitchen, so far; before/after images of the front door; some cool Basement Archaeology shots; and other things, with my typical boring narration. Oh, and please pardon our dust and construction debris. Everywhere.

And Now, to the Pictures!

First, the kitchen, before:


Bleh. Notice the grimy blue carpet. It's glued down ... with wood glue.

and so far:


The cabinets are being painted flat black (blackboard paint), with silver lower doors, and Safety Red drawers and upper doors. I cleaned the chromed handles, which are all the same for the main bank of cabinets (BTW, magic eraser sponges work great for this, with a bit of degreaser for the greasy parts - my friend K. thought I had replated them!), then picked out the six most worn ones and sprayed them black with epoxy paint. Those six went on the matte silver doors, and the cleaned chrome ones look wonderful against the red painted drawers.

We plan to do the same to the sink cabinet, but it involves a bit more work to take apart. Plus we need to buy more paint...

I am really loving how the cheapo sticky tiles are making the old floor look larger. It's not ideal, and not period to the house, but we'll have a kitchen we can enjoy until we can do better.

And now, the Original Front Door (now the living room interior door), with Icky Kwiky goldtone lockset:


and without:


The paint is pretty bad, yes, but cleaning the hardware and making it pretty can wait until we're in the house. Removing the offending modern lockset prior to moving in could not wait. And it still looks better than it did.

I'm no Indiana Jones, but I did discover some cool stuff in the cellar.

For example, when you look up and you aren't busy being terrified by Horrible Old Wiring, you can find some bizarre things, like an old Esso sign being used to fit the new ductwork under the original coal furnace heat vent:


Plus, I think the part that was cut out is leaning against a wall elsewhere. Neat.

Now, I know it's not cellar related, but do you remember these?


They are the access panels for the bathroom plumbing. Which has no cutoff valves. None. Zip. Nada. I have no idea why you need access panels if you have no cutoff valves. Yes, they are on our to-do list.

Anyway, those panels? They're made of another old sign:


I think the rest of it has been used to make the interior cellar door solid, and that's a whole entry all by itself. Anyway, get a load of the name - "Critic Feeds" :D

Back to creeping around in the basement. I stuck the camera through a hole I punched in the plastic stapled over the access to the foundation of the dining room bay, adn I took some photos, to see what was there.

I found an old porch swing and some mouldings:


God knows if that thing can be saved, but it's pretty cool to find it at all.

and what probably happened to parts of the original kitchen cabinets:


Yep, that's what they are. I don't think they are salvageable. Makes you sad, too, doesn't it? At least I will have references to use when we do get around to doing the Big Kitchen Renovation.

And finally, to close, here's a couple of images of the old (but not original) coal furnace:


It's still hooked up to the flue, but obviously hasn't been used for decades. That first photo is its tag, which is on the back. It's probably a 1930's model, judging from the styling.

More photos later, but this is a good start. I still haven't found any stamping, but I'm too pregnant to fit through the attic access panel, which is where i'm most liekly to find marks.

Lockset Archaeology, plus more working lights!

We spent yesterday continuing with the electrical work and moving original parts of the house around. Now, thanks to our Wonderful Freinds, we have a hallway light fixture, and my son's room has light, and things are really moving along that way. So well, in fact, that we need to buy some more wire :)

However, Chris and I did stuff not related to electrical work. We went looking for various bits of hardware that had been relocated over the years and tried to put it back. This kind of thing is one of my favorite rehab activities - I get to play archaeologist.

I was started on that path because our original (now interior, as our porch was enclosed 10 years ago) front door had had its lockset and attendant hardware removed and replaced with a modern Kwikset lockset (YUCK! I despise shiny yellow goldtone) sometime in the last 30-odd years. There have not been any keys for that lockset for nearly 15 years (according to the PO), so we were going to have to remove it, no matter what, and replace it with something that our 3-year-old can't use to permanently exclude us from the house.

I thought of something odd I had seen on the (now interior - also has a now-enclosed porch) back door, involving a knob/key plate that didn't look like it was set right. It looked too large, and the interior one, while smaller, was still larger than the rest of the interior plates. This matched up nicely with the scars on the front door, as did the edge face of the lockset, once we removed the Icky Kwicky lockset and knobs. I delightedly disinstalled the relocated mortise lockset and brought it into the living room, where Chris was working on the door.

Chris observed that the latch was going the wrong way, and said that this must not be the right set. I pointed out that somebody had clearly disassembled the lockbox and removed the deadbolt (I'm guessing about the time the key disappeared) and the button stops (privacy knob-locks). It looks very similar to this repro mortise lockset, but is made of iron with steel working parts. Chris then unscrewed the two screws, pulled out the latch and flipped it over, and put it all back together. After all that, it worked fine and tapped into its original hole perfectly. We still have to strip off the eighty-one billion layers of old paint from the plates, and then refinish them and the knobs, but it already looks a million times better.

Yes, our internal kitchen/back door is now without knobs, but I know where its originals went (and plan to harvest them and replace them), and the latch hadn't lined up with the (wrong) strikeplate for decades anyway. It had locked with first a twist bolt (since painted into oblivion) and then a small surface bolt for ages and ages.

I have ambitous plans for relocating various doors throughout the house so they are more useful (such as the all-glass basement entry and its lovely old wood-framed screen door, the current interior kitchen rear door, and the old kitchen/hall door). There are two non-original, but clearly older, doors that are going to go away to more appropriate homes once the doorway shuffling is complete.

There's also some strangely located edge molding that was stuck into the cellar stair doorway in addition to the stop molding. For no good reason. That will also be removed, stripped and reused in one of the several places such molding was yanked out. But it can wait. Next winter, maybe...

As for future plans, anyone have shellacking or varnishing tips for me? I'll need to coat the cleaned door/window hardware to make it match any non-painted stuff that still exists in the house, as all the hardware was in place when the wood was finished, with shellac. And our windows in the dining room bay need to be refinished, as there's old water damage from before the storm windows went on.

Why is it, that as soon as a task gets struck from the list, two more spring up to take its place?