The master bedroom is nearly denuded of its many layers of Vile Old Paper. Some of it, say, the gray-and-pearl stripe with its coordinating ceiling paper and edgings, was okay (not my taste, but tolerable), but others were emphatically NOT. Let's just say that I really don't think that Mrs. Songer (2nd owner of the home, from whose life most of the wallpapers date - the renters in the 40's may have papered too, but the Whites mostly painted, before the panelling went up) and I would have agreed on any decorating decisions. I am especially unfond of the mint-icecream colored floral stripe dating from the 1930's and its posy borders. Made me feel like I was in a perfume box, just looking at it, and I reminded myself that it was the choice of an older widowed lady.
I still like the ochre that the Wolfes painted the bedrooms originally, even if it also covers the ceiling, making it an oppressive color choice. I liked their paper in the dining room and hallway. We're not going with that color scheme, though. The bedroom will be gray, a soft, cloudlike, cool gray, with a coordinating sandtexture painted ceiling and a blue stripe at wallpaper-border level around the room.
We are returning to the Hell of Vile Paper Shreds momentarily, to continue our labors. Surely we must have painted over old wallpaper in some past life to have earned this suffering. O! See How I Lament! Perhaps if I do enough of this in this life, I will never have to do it again.
My happy place for this work is the vision of the soft grey room in which I will sleep, in our overpoweringly large bed with its new curtains. So calming. Our bed really isn't quite so large, but it's close enough to pretend that we have that bed.
Also, the heat isn't on yet. We wanted to get the soaking and scraping done with first, before we dry out the house too much. Hurrah for wrongheaded prioritizing!
Showing posts with label paint. Show all posts
Showing posts with label paint. Show all posts
Wednesday, December 06, 2006
Monday, September 25, 2006
Advice for the Sticky Tile Questioner
Sweetie, your email bounced, so I'm making the reply a post!
Sticky tiles on counter as a temporary face lift atop hideous old Formica until real money/real remodelling comes along:
I've done this in my mom's kitchen and mine (both are temporary!!! and will need to be replaced in a few years), and for both projects I used the stone-textured tiles that are fairly rigid. They cut with a razor knife, just like the thinner/cheaper ones, but take a bit more effort (and a straight edge - like a counter top edge- to snap them over) to snap.
Teh best advice I can give is to make sure your counter is CLEAN and smooth (I had to mount that molding on the edge and shim underneath to make my 3 independent counter sections contiguous and smooth enough to tile). The tiles will stick best to Formica if it's not bubbled, chipped or damaged. If the counter is damaged/chipped/has an uneven surface, ask the floor guy at the hardware store for advice on picking out a floor levelling compound. Don't tell him why, though, or he'll try to sell you a new counter.
I don't really recommend this for covering any other counter surface, like wood, ceramic tile (if it's really ugly, get it refinished instead, or if the grout is bad, clean it up and re grout it.), or bare particleboard. If it's wood, you'll get weird water damage issues, and that is a whole other kettle of fish.
Things I've learned about non-standard uses for sticky-tiles:
Okay, now to paint choices for cabinets:
My cabinets are steel 1950's cabinets. Paint choices for these don't necessarily apply to wood or melamine cabinets. If you have non-metal cabinets ask someone at the paint store for advice. There are special paints for melamine, for example.
I used appliance epoxy spray paint for the doors, except for the red ones. I'm not very happy with how the red ones turned out and may take them down and re-paint them with a different, more durable, even paint. What I used was regular safety red (fire engine red) spray paint, and I'm probably going to re-do them with tractor spray paint (not as good for my purposes as appliance epoxy, but comes in more colors).
The matte black paint on the cabinets is brush- or roll-on chalkboard paint, and it comes in a can, which was necessary as I wasn't going to be able to move the cabinets outside to repaint them (when they come down, they're going AWAY and period-appropriate ones are going up in their places). I just took the drawers and doors out for painting in the contrast colors. I understand that you can use this paint in nearly any surface as long as it's prepared correctly, which means sanding it smooth (but not too smooth), filling any dents, and re sanding to smooth it and allow the paint to stick properly (that's a from-memory summary of the surface prep instructions on the can). I used 3 coats, waiting until each coat was dry before putting up the next. It can cover in one coat, but I have kids, and wanted the surface to be durable. 1 quart did all my cabinets and left me enough to do part of the wall for another chalkboard.
If you have an old appliance (like a stove or fridge) that is chipped or in a weird color, appliance epoxy is the stuff you need to refinish it. However, stoves require high-temp paint on the cooking surface, and that comes only in matte black, silver, white and cream, so keep that in mind when you are planning to refinish one, and figure out how you want the overall look to work before you buy paint.
Now, I shall return to feeling sorry for myself about my apparent ear infection.
Sticky tiles on counter as a temporary face lift atop hideous old Formica until real money/real remodelling comes along:
I've done this in my mom's kitchen and mine (both are temporary!!! and will need to be replaced in a few years), and for both projects I used the stone-textured tiles that are fairly rigid. They cut with a razor knife, just like the thinner/cheaper ones, but take a bit more effort (and a straight edge - like a counter top edge- to snap them over) to snap.
Teh best advice I can give is to make sure your counter is CLEAN and smooth (I had to mount that molding on the edge and shim underneath to make my 3 independent counter sections contiguous and smooth enough to tile). The tiles will stick best to Formica if it's not bubbled, chipped or damaged. If the counter is damaged/chipped/has an uneven surface, ask the floor guy at the hardware store for advice on picking out a floor levelling compound. Don't tell him why, though, or he'll try to sell you a new counter.
I don't really recommend this for covering any other counter surface, like wood, ceramic tile (if it's really ugly, get it refinished instead, or if the grout is bad, clean it up and re grout it.), or bare particleboard. If it's wood, you'll get weird water damage issues, and that is a whole other kettle of fish.
Things I've learned about non-standard uses for sticky-tiles:
- Don't use sticky tiles on vertical surfaces unless there is something supporting them from the bottom (like mouldings), unless you want to have to go back and glue them in place with E-6000 in 3-6 months (or on any hot day). My mom has a few vertically placed tiles that slipped for 2 reasons (no primer and no support) which we have had to re-mount. All the tiles on my walls in my kitchen that I was lazy about (i.e. walked away from the job half-finished because I've been really ADD about this house) and did not support with mouldings have slipped because the house wasn't air-conditioned this summer, and I have to re-mount them when I get the mouldings put up. The ones that were supported are fine.
- If you do have to remount, use E-6000. It works really well. Spread it thin. If the tile is reluctant to be remounted, tape it up with masking tape while you wait for it to set. Alternatively, use a contact-type cement (whatever type you are comfortable with).
- If you put tiles on vertical surfaces, use the thinner/cheaper kinds of tile (heavier tiles will slip even if the adhesive is good), but don't go with a discount brand, as the adhesive is different and not as secure. I'd avoid them for any surface or use, really, as they tend to slip or peel up no matter what.
- ALWAYS use the latex surface primer for applying sticky tile, as it really improves the adhesion.
Okay, now to paint choices for cabinets:
My cabinets are steel 1950's cabinets. Paint choices for these don't necessarily apply to wood or melamine cabinets. If you have non-metal cabinets ask someone at the paint store for advice. There are special paints for melamine, for example.
I used appliance epoxy spray paint for the doors, except for the red ones. I'm not very happy with how the red ones turned out and may take them down and re-paint them with a different, more durable, even paint. What I used was regular safety red (fire engine red) spray paint, and I'm probably going to re-do them with tractor spray paint (not as good for my purposes as appliance epoxy, but comes in more colors).
The matte black paint on the cabinets is brush- or roll-on chalkboard paint, and it comes in a can, which was necessary as I wasn't going to be able to move the cabinets outside to repaint them (when they come down, they're going AWAY and period-appropriate ones are going up in their places). I just took the drawers and doors out for painting in the contrast colors. I understand that you can use this paint in nearly any surface as long as it's prepared correctly, which means sanding it smooth (but not too smooth), filling any dents, and re sanding to smooth it and allow the paint to stick properly (that's a from-memory summary of the surface prep instructions on the can). I used 3 coats, waiting until each coat was dry before putting up the next. It can cover in one coat, but I have kids, and wanted the surface to be durable. 1 quart did all my cabinets and left me enough to do part of the wall for another chalkboard.
If you have an old appliance (like a stove or fridge) that is chipped or in a weird color, appliance epoxy is the stuff you need to refinish it. However, stoves require high-temp paint on the cooking surface, and that comes only in matte black, silver, white and cream, so keep that in mind when you are planning to refinish one, and figure out how you want the overall look to work before you buy paint.
Now, I shall return to feeling sorry for myself about my apparent ear infection.
Sunday, September 10, 2006
Progressions, Plans and a Thing In The Attic
So, it's Autumn, we've owned our home for 6 months (only 6? it feels like an eternity), and we've made some small progress. There's paint in the hallway now, a "Very Craftsman" green, according to Mom, and I'm working my way around the dining room. We've got all the floors clean of hideous carpet, though some are a little scarred from the experience. The living room is done, save for scouring the floor to remove the last of the carpet pad, and I've got a lovely play area set up for my older son to use while we work. The bath is half tiled, and the master bedroom still languishes, but at least there's a light in there. Things are moving along, if slowly.
I'm aiming for Hallowe'en as our move-in goal.
I have made some sketches of what I'm doing with parts of the house. My plan for the dining room bay is to take this:
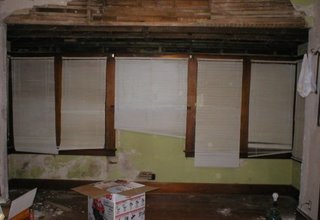
The dining room bay as it appears now.
And turn it into this:
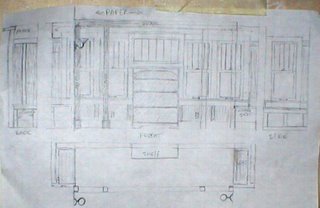
I made the sketch without looking at the bay so I misdrew the windows - they actually cover the full width of the bay. Other than that, it's spot on. The posts are structural, not just cosmetic. They will support the poorly-remodeled wall cutout on a 4x4 beam, and we've got plenty of mouldings to wrap them with, to make them look Really Original. Eventually, I'd like to add cosmetic ceiling beams to the dining room, too, but this comes first.
The bookshelf is actually a family heirloom, which belonged to my paternal grandmother. It's going to be mounted permanently to the wall, and there will be wainscot added around it, right up to the vertical posts at the corners. It'll be the same as the panelling in the "built-in" I made to fill the arch.
The window seats will be made of the salvageable parts of the old living room archway double doors, which apparently sat unloved for many years in some leaky place. The bottoms have completely rotted, leaving me with a nifty, but not reusable, item. I decided (since I can't replace them where they belong, and because I want to make them again a part of the house), to make window seats of them. Also, the bay is only 4 feet wide, the ends are not evenly deep, and that space is nearly wasted. Finally, it is because I have really fond memories of the enormous window seat in the dining room of my parents' craftsman bungalow when I was a kid. Nothing like curling up in a sunny window with a good book. I want my kids to have that.
Speaking of kids, I'm still working on FX's room. When last I posted about it, we were here:
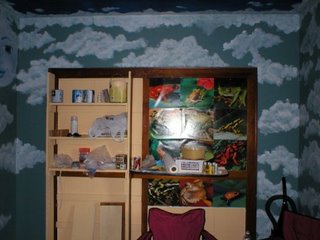 There are a few more shelves in the bookshelf, but it pretty much still looks this way now.
And we (which really means "I") plan to finish it thusly:
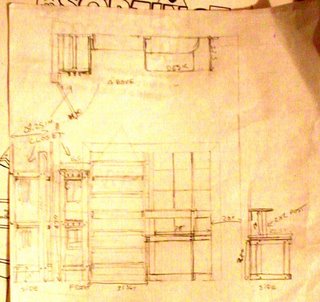
That's going to be an open closet with coat hooks on the outside, and shelves for shoes. The closet will have an upper and lower level, the upper one being for things he wears every once in a while (Sunday or seasonal clothes) and the lower being for his school clothes. The desk in the plans is all cut out, but not assembled.
Now to the progress. Quite a bit has been done, some has even been reported, none has been photographed ... Until now!
 The Very Craftsman Green hallway.
That's just bare old plaster above the border. The frieze paper (really only by virtue of position - its only pattern is a sort of golden parchment look) goes up after the whole dining room and hallway are painted, and really will look more like an intended plaster finish similar to what's there now, but without the obvious patches and old mucilage. I love how the border paper looks, even if it's only tacked up.
The dark green will make a lovely background for two paintings, done by my cousin, that I was given. You can see one if them in the photo of the living room:
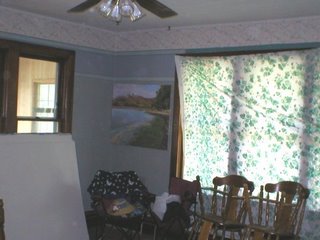 It'll be nice when there's furniture in it. Not lawn furniture.
I love that vintage Greek key paper, but there wasn't quite enough. I have to make some more, which will involve printing it on archival quality paper and pasting it up. It's always something :)
Now, the floor. Here, you can see the line of demarcation between the dining room and living room where the two different carpets once laid edge-to-edge:
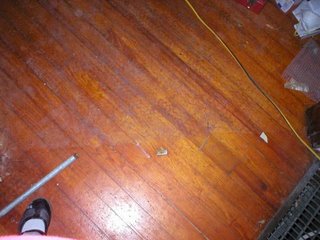 Seamy, Isn't it?
Yes, I figure they didn't strip off the old wax prior to laying down a pink rubber carpet pad however umpteen years ago, so when the pad degraded, it bonded to the old wax, leaving ... this. This is after scraping for two days. I'll keep you posted on the scrubbing and what works. Once it's scrubbed, I'm waxing it.
Call me old-fashioned, or call me masochistic - we do have 2 kids and a dog - I like waxed floors, even if I know what it takes to keep them up.
And now for the playroom:
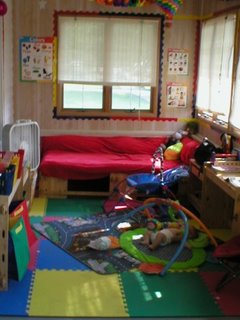
It's not perfect, but it's a nice, bright, stimulating environment for a 3 year old boy. And he loves it, which is what counts.
On to the half-tiled bath. First, a before picture is in order:

Now, we have this:
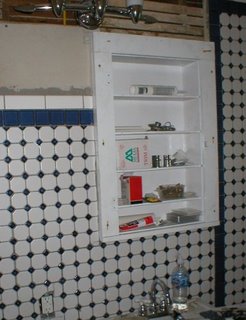 That's the "fixture wall" with the new/old medicine cabinet in it, sans door.
We were lucky enough to find the old girl under the dining room bay, and she's sound, so I painted her and in she went. The mirrored door is in the kitchen until we're all done flinging heavy stuff around in the bathroom. I wish I had time to finish in there right now, but I don't.
And the master bedroom currently houses all the salvaged lumber, mouldings, doors and panelling:
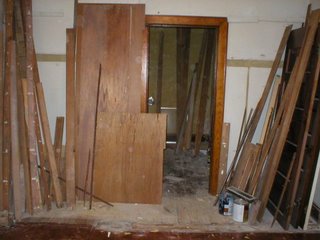 Sad, isn't it? Eventually, we will have to sleep in here.
Finally, we come to The Thing in the Attic:
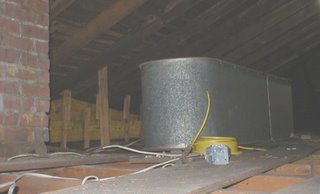 The Titanic, or our cistern.
A few months back, when I wasn't allowed up on ladders, my friend K stuck her head up in the attic where her husband J had been working to look for a tool we needed (we were demoing something), and said: "Hey! There's some kind of wash tub up here!"
I, of course, pictured a round tin tub, with handles, like the sort that get sold for icing down beers, and thought "Cool! I could use that for something."
Many weeks later, I stick my own head up there and see this HUGE bathtub shaped thing, about 4 feet wide and maybe 8 or 9 feet long, and a good 4 feet high. It must be the old water-pressurizing cistern, and must have been in here since the place was built. The way these things worked was that you'd pump water up here from the well, by hand, and it would sit up here until you turned on the taps, which would give you water pressure, like a water tower. It certainly goes a long way toward explaining some of the odd plumbing in the basement.
Now, what are we going to do with it if we ever decide to finish the attic?
I'm aiming for Hallowe'en as our move-in goal.
I have made some sketches of what I'm doing with parts of the house. My plan for the dining room bay is to take this:

The dining room bay as it appears now.
And turn it into this:

I made the sketch without looking at the bay so I misdrew the windows - they actually cover the full width of the bay. Other than that, it's spot on. The posts are structural, not just cosmetic. They will support the poorly-remodeled wall cutout on a 4x4 beam, and we've got plenty of mouldings to wrap them with, to make them look Really Original. Eventually, I'd like to add cosmetic ceiling beams to the dining room, too, but this comes first.
The bookshelf is actually a family heirloom, which belonged to my paternal grandmother. It's going to be mounted permanently to the wall, and there will be wainscot added around it, right up to the vertical posts at the corners. It'll be the same as the panelling in the "built-in" I made to fill the arch.
The window seats will be made of the salvageable parts of the old living room archway double doors, which apparently sat unloved for many years in some leaky place. The bottoms have completely rotted, leaving me with a nifty, but not reusable, item. I decided (since I can't replace them where they belong, and because I want to make them again a part of the house), to make window seats of them. Also, the bay is only 4 feet wide, the ends are not evenly deep, and that space is nearly wasted. Finally, it is because I have really fond memories of the enormous window seat in the dining room of my parents' craftsman bungalow when I was a kid. Nothing like curling up in a sunny window with a good book. I want my kids to have that.
Speaking of kids, I'm still working on FX's room. When last I posted about it, we were here:
 There are a few more shelves in the bookshelf, but it pretty much still looks this way now.
And we (which really means "I") plan to finish it thusly:

That's going to be an open closet with coat hooks on the outside, and shelves for shoes. The closet will have an upper and lower level, the upper one being for things he wears every once in a while (Sunday or seasonal clothes) and the lower being for his school clothes. The desk in the plans is all cut out, but not assembled.
Now to the progress. Quite a bit has been done, some has even been reported, none has been photographed ... Until now!
 The Very Craftsman Green hallway.
That's just bare old plaster above the border. The frieze paper (really only by virtue of position - its only pattern is a sort of golden parchment look) goes up after the whole dining room and hallway are painted, and really will look more like an intended plaster finish similar to what's there now, but without the obvious patches and old mucilage. I love how the border paper looks, even if it's only tacked up.
The dark green will make a lovely background for two paintings, done by my cousin, that I was given. You can see one if them in the photo of the living room:
 It'll be nice when there's furniture in it. Not lawn furniture.
I love that vintage Greek key paper, but there wasn't quite enough. I have to make some more, which will involve printing it on archival quality paper and pasting it up. It's always something :)
Now, the floor. Here, you can see the line of demarcation between the dining room and living room where the two different carpets once laid edge-to-edge:
 Seamy, Isn't it?
Yes, I figure they didn't strip off the old wax prior to laying down a pink rubber carpet pad however umpteen years ago, so when the pad degraded, it bonded to the old wax, leaving ... this. This is after scraping for two days. I'll keep you posted on the scrubbing and what works. Once it's scrubbed, I'm waxing it.
Call me old-fashioned, or call me masochistic - we do have 2 kids and a dog - I like waxed floors, even if I know what it takes to keep them up.
And now for the playroom:

It's not perfect, but it's a nice, bright, stimulating environment for a 3 year old boy. And he loves it, which is what counts.
On to the half-tiled bath. First, a before picture is in order:
Now, we have this:
 That's the "fixture wall" with the new/old medicine cabinet in it, sans door.
 We were lucky enough to find the old girl under the dining room bay, and she's sound, so I painted her and in she went. The mirrored door is in the kitchen until we're all done flinging heavy stuff around in the bathroom. I wish I had time to finish in there right now, but I don't.
And the master bedroom currently houses all the salvaged lumber, mouldings, doors and panelling:
 Sad, isn't it? Eventually, we will have to sleep in here.
Finally, we come to The Thing in the Attic:
 The Titanic, or our cistern.
A few months back, when I wasn't allowed up on ladders, my friend K stuck her head up in the attic where her husband J had been working to look for a tool we needed (we were demoing something), and said: "Hey! There's some kind of wash tub up here!"
I, of course, pictured a round tin tub, with handles, like the sort that get sold for icing down beers, and thought "Cool! I could use that for something."
Many weeks later, I stick my own head up there and see this HUGE bathtub shaped thing, about 4 feet wide and maybe 8 or 9 feet long, and a good 4 feet high. It must be the old water-pressurizing cistern, and must have been in here since the place was built. The way these things worked was that you'd pump water up here from the well, by hand, and it would sit up here until you turned on the taps, which would give you water pressure, like a water tower. It certainly goes a long way toward explaining some of the odd plumbing in the basement.
Now, what are we going to do with it if we ever decide to finish the attic?
Friday, September 08, 2006
Paint me, baby!
I'm heading over to the New House (as distinct from mom's place, the Old House - by 60 years) today, to get a wall painted in the dining room.
Yes, you read that right. The dining room is slowly becoming a usable space. I did teh test patches of paint day before yesterday, and I will be applying paint, for real, to the repaired plaster walls today. I can hardly beleive it.
I'm taking the camera for pictures of what's Done So Far. I may even get them posted tonight.
Of course, the bath is only half-tiled, the kitchen needs the rest of its wiring, the master bedroom isn't much beyond the demo stage, and I still have an old bathtub in one half of the enclosed sunporch, but we're getting there.
That light at the end of the tunnel might even be the end of the tunnel, and not another train ... but I'll knock wood to be sure.
Tuesday, August 01, 2006
The Clock is Ticking
We are supposed to be moved in, at least enough to to consider ourselves to be residing in our house, by the time my older son returns from Texas. We have until the 9th.
Tick, tick, tick...
Understandably, between this and the heatwave, I've stopped sleeping. I decided, therefore, to get out of bed at 4 am and go paint my living room. It seemed like a ggod idea, and lo, by 8 am, there was a successful paintjob, even if I had to stop and patch a couple of cracks I hadn't fixed yet, mid-painting. Our living room now only requires the border papers (2 hours) and removal of the Vile Pea-Green Shag Carpet (however long it takes, I'll enjoy every ripping, wrenching moment).
It already looks Really Nice. The greys I picked really set off the cherry-stained woodwork, and the wood floor, once completely revealed, should just make it that much more wonderful.
tick
I still have work to do on the bath, but it should be in its temporary usable stage by Thursday night. Toilet, sink, tub, cheap plastic temporary flooring... Not lovely, but a place to go. A water-resistant place, at least, and that's always an improvement.
tick
I've decided to just Make Do with our bedroom. I can re-hang the window skirting board, patch what needs patching, and paint, paint, paint. We have Way Too Much To Do left to really make this livable before moving in (like patching in the floorboards where the curtain wall was, finishing the raw flooring in the former closet, resetting the mouldings, and pulling down the boards the acoustic tiels were stapled to) to worry about things like scraping out two rooms worth of hideous layered wallpaper. Unless it comes down Very Easily. I already pulled up the carpet, but put iback down to protect the floor from our construction.
tick
I Really Must finish the painting in the kitchen, for safety reasons. There's the old flaky wall that I'm still only halfway through scrubbing with a wire brush, which also needs patching (natch) as well as painting afterwards.
tick
Then, we have our Fabulous Debris Collection. It's been preventing work on the dining room (we won't even go there - we plan to get that mostly done AFTER number one son comes home) and the porch (which, mercifully, needs little work done) for two months. The dumpster finally arrives tomorrow morning. I await its appearance with ... cynicism. There's a reason we've been collecting debris for months, and it was a dumpster shortage. I really do hope we can get it, though.
Tick, tick, tick...
Tick, tick, tick...
Understandably, between this and the heatwave, I've stopped sleeping. I decided, therefore, to get out of bed at 4 am and go paint my living room. It seemed like a ggod idea, and lo, by 8 am, there was a successful paintjob, even if I had to stop and patch a couple of cracks I hadn't fixed yet, mid-painting. Our living room now only requires the border papers (2 hours) and removal of the Vile Pea-Green Shag Carpet (however long it takes, I'll enjoy every ripping, wrenching moment).
It already looks Really Nice. The greys I picked really set off the cherry-stained woodwork, and the wood floor, once completely revealed, should just make it that much more wonderful.
tick
I still have work to do on the bath, but it should be in its temporary usable stage by Thursday night. Toilet, sink, tub, cheap plastic temporary flooring... Not lovely, but a place to go. A water-resistant place, at least, and that's always an improvement.
tick
I've decided to just Make Do with our bedroom. I can re-hang the window skirting board, patch what needs patching, and paint, paint, paint. We have Way Too Much To Do left to really make this livable before moving in (like patching in the floorboards where the curtain wall was, finishing the raw flooring in the former closet, resetting the mouldings, and pulling down the boards the acoustic tiels were stapled to) to worry about things like scraping out two rooms worth of hideous layered wallpaper. Unless it comes down Very Easily. I already pulled up the carpet, but put iback down to protect the floor from our construction.
tick
I Really Must finish the painting in the kitchen, for safety reasons. There's the old flaky wall that I'm still only halfway through scrubbing with a wire brush, which also needs patching (natch) as well as painting afterwards.
tick
Then, we have our Fabulous Debris Collection. It's been preventing work on the dining room (we won't even go there - we plan to get that mostly done AFTER number one son comes home) and the porch (which, mercifully, needs little work done) for two months. The dumpster finally arrives tomorrow morning. I await its appearance with ... cynicism. There's a reason we've been collecting debris for months, and it was a dumpster shortage. I really do hope we can get it, though.
Tick, tick, tick...
Labels:
bathroom,
behind schedule,
bungalow,
debris,
demo,
kitchen,
paint,
progress,
temporary solutions
Thursday, July 06, 2006
Dancing Idiot has a Baby. Film at 11.
Well, I'm now off bedrest - the baby is here. James Edward was born Jume 17th at 2 am on the dot, preceded by much screaming and accompanied by a great deal of relief. He's doing great, and so am I ... now.
It's been almost 3 weeks since then and I've finally gotten back into the house (first because of the bedrest and then the postpartum healing/in-law visits) to do a bit of work. I did actually get a few things done this afternoon, between removing the old storm door from what is now an interior doorway and wandering around the house a lot. I also got some progress made on my older son's bedroom murals, after discovering that the midnight blue mismix we bought for his ceiling had been mismarked, too. It's lavender. I guess I can figure out a use for a pint of lavender paint, but I was thwarted in my plans for the day.
"Oh, poor me, I'll have to go to the home store again for supplies. Whatever shall I do?"
Also, our sainted freind and electrical engineer J got the wiring/box/etc in place for the power company to come in and do the meter and service upgrade. That's tomorrow. I'm doing a happy dance, but that doesn't translate well in print. This is a good thing, as I look like an idiot - a happy idiot, but an idiot nonetheless.
The bad: we've discovered that the drainpipe from the kitchen sink needs replacement, in a rather unfortunate way - it fell off. Well, better to have found that out before we do all the other plumbing work, no? We plan to do that stuff next week, and I think we can fit a bit more PVC pipe into the budget. We'll have to, or no move-in before FX gets back from visiting our relations in Texas.
Sunday, May 14, 2006
Pictures, and progress.
Or is that "Pictures of Progress?" I'm not sure. Anyhow, here are some images of what I've been ranting about recently. Updates to my in-progress phots are here.
First, I was talking about filling in the open archway between what had been originally intended as a den and the dining room, so that my son could have some privacy (and so that we could make use of otherwise wasted space). I wanted to do something really Stickley-style, like a fabulous built-in. We really don't have the money for that and all the other things we need to do first, so I had to figure out how to do this in a sympathetic, period looking style without spending any real money, as well as doing a temporary thing.
Why temporary? Well, in five or so years, we plan to have two bedrooms and a bath built in the cellar, for the boys, as well as a completely finished laundry room, workspace, and finsihed storage areas. When that happens, we can turn our den back into a den, and I'd like to be able to put in abbreviated Craftsman-style cabinets with square pillars inside that archway. So anything we do now is just set dressing.
Here's the before pic, with the PO's non-sympathetic solution (vinyl accordion curtains):

This is taken from the dining room, looking west into the den (my son's bedroom). Not pretty, but it worked for the PO, an elderly woman in need of constant care.
Now, a series of on-the-way-to-after pictures, taken from the same vantage point:


This is a demo-in-progress image of the dining room bay addition. It's slightly less ugly right now, but we have some fairly major work to do here. First, we are going to put in posts and a support beam, as you can see some bowing where the bay was cut into the wall. There will be four posts, two at the ends, mounted flush to the walls, and two set in about 2' from the ends to create an open but divided space. There will be wainscot panels done in the same style as the archway fill-in in the bay, from the corners and under the windows, a built-in bookshelf under the center short window, and I'm going to build two window seats into the otherwise wasted space in the ends of the bay as well. I think this will all work together with the built-in panel in the arch, to increase the "Craftsman" feel of the house. I see a larger can of Minwax Polyshades in my future.
Now for the view from my son's room:


These are all shots of the part of the paintjob that had to be done before I could get back to cutting and screwing things up ... er ... together. There will be clouds painted on the walls, and the ceiling will be a deeper, more vibrant blue with stars and a moon on it. I'm debating painting in a wainscot strip with related, A&C type elements. That will probably depend on the time available before we move in.
And, I still need a radio. The talking to myself is really out of hand. I've been talking to my tools ... more than usual.
First, I was talking about filling in the open archway between what had been originally intended as a den and the dining room, so that my son could have some privacy (and so that we could make use of otherwise wasted space). I wanted to do something really Stickley-style, like a fabulous built-in. We really don't have the money for that and all the other things we need to do first, so I had to figure out how to do this in a sympathetic, period looking style without spending any real money, as well as doing a temporary thing.
Why temporary? Well, in five or so years, we plan to have two bedrooms and a bath built in the cellar, for the boys, as well as a completely finished laundry room, workspace, and finsihed storage areas. When that happens, we can turn our den back into a den, and I'd like to be able to put in abbreviated Craftsman-style cabinets with square pillars inside that archway. So anything we do now is just set dressing.
Here's the before pic, with the PO's non-sympathetic solution (vinyl accordion curtains):
This is taken from the dining room, looking west into the den (my son's bedroom). Not pretty, but it worked for the PO, an elderly woman in need of constant care.
Now, a series of on-the-way-to-after pictures, taken from the same vantage point:
This is a demo-in-progress image of the dining room bay addition. It's slightly less ugly right now, but we have some fairly major work to do here. First, we are going to put in posts and a support beam, as you can see some bowing where the bay was cut into the wall. There will be four posts, two at the ends, mounted flush to the walls, and two set in about 2' from the ends to create an open but divided space. There will be wainscot panels done in the same style as the archway fill-in in the bay, from the corners and under the windows, a built-in bookshelf under the center short window, and I'm going to build two window seats into the otherwise wasted space in the ends of the bay as well. I think this will all work together with the built-in panel in the arch, to increase the "Craftsman" feel of the house. I see a larger can of Minwax Polyshades in my future.
Now for the view from my son's room:
These are all shots of the part of the paintjob that had to be done before I could get back to cutting and screwing things up ... er ... together. There will be clouds painted on the walls, and the ceiling will be a deeper, more vibrant blue with stars and a moon on it. I'm debating painting in a wainscot strip with related, A&C type elements. That will probably depend on the time available before we move in.
And, I still need a radio. The talking to myself is really out of hand. I've been talking to my tools ... more than usual.
Saturday, April 15, 2006
Kitchen! I am the Sticky-tile Empress!
What is she going on about? I'm really good at doing things with sticky tile (self-stick vinyl tiles for the normal people reading), many of which sticky tile was never intended to do. I've done my grandmother's bathroom, in such a way that it looks like we spent FAR more than 100 bucks on it. Mosaic, fancy cuts, etc. I get crazy with the stuff. It's wonderful when you want something to be temporarily livable/pretty until you can do the real renovations, and you've got a small budget.
Anyway, I stuck it to the Awful Tileboard in our kitchen toady, and to the Hideous Vomit-and-Cream Formica counter, as well as to our floor. The floor was fairly normal and straightforward, and has come out BEAUTIFULLY. Here we have photos of my kitchen cabinets, just about complete:


I must, at this point, add that I am Very Impressed with the latex surface primer suggested by some nice sales monkey at one of the big home-improvement stores we've haunted recently. It DOES actually help the tiles adhere. VERY WELL - so well, in fact, that there will be no repositioning of tiles. If you screw up, scrape the tile up and get a new one out. This means that my normally non-feasible technique of covering up hideous formica tileboard (done it before, natch) with sticky tiles is now much more practical.
Also here is a preview of my plans for the sink cabinet:

This will, of course require Even More Paint, plus more sticky tiles (I have those) and I have to make another trip to the hardware store to buy the right size nylon washers (so I can replace the drawer slide roller wheels and my drawers will hang straight). It's SOOOO obviously a mockup, but that still looks better than what's there.
You may have noticed some of the doors hanging open, above. There's a reason. The closure springs are mostly gone. A question, for anyone who may be reading this: Do you know of a source for replacement hinge-spring assemblies for old steel cabinets? I'm fairly good at research, but this has me stumped.
Anyway, I stuck it to the Awful Tileboard in our kitchen toady, and to the Hideous Vomit-and-Cream Formica counter, as well as to our floor. The floor was fairly normal and straightforward, and has come out BEAUTIFULLY. Here we have photos of my kitchen cabinets, just about complete:
I must, at this point, add that I am Very Impressed with the latex surface primer suggested by some nice sales monkey at one of the big home-improvement stores we've haunted recently. It DOES actually help the tiles adhere. VERY WELL - so well, in fact, that there will be no repositioning of tiles. If you screw up, scrape the tile up and get a new one out. This means that my normally non-feasible technique of covering up hideous formica tileboard (done it before, natch) with sticky tiles is now much more practical.
Also here is a preview of my plans for the sink cabinet:
This will, of course require Even More Paint, plus more sticky tiles (I have those) and I have to make another trip to the hardware store to buy the right size nylon washers (so I can replace the drawer slide roller wheels and my drawers will hang straight). It's SOOOO obviously a mockup, but that still looks better than what's there.
You may have noticed some of the doors hanging open, above. There's a reason. The closure springs are mostly gone. A question, for anyone who may be reading this: Do you know of a source for replacement hinge-spring assemblies for old steel cabinets? I'm fairly good at research, but this has me stumped.
Subscribe to:
Posts (Atom)