Wednesday, May 30, 2007
Roadtrip!
I'll be even less reliable about posting for a few weeks, as we are moving. If I do post, it'll be about Bobby as I'm dragging him along with me.
PSA: Hiatus
We'll be offline for at least 2 weeks, possibly more. Expected date of return is June 18th.
I may post a few images in the meantime, but no promises or guarantees are made.
I may post a few images in the meantime, but no promises or guarantees are made.
Day 70: logo design process

Here's a montage of my process in figuring out a nice signable logo/sigil. I got married to my husband 3 years ago and hadn't stopped signing my work with my maiden name or plain print initials. It struck me a kind of stupid, since my work isn't well known enough for me to cling to a name I've always found awkward to sign.
So I started doodling. I went through more literal letterforms with accent strokes, realized it felt too fluffy to do that, I wanted something easier, more efficient than what I'd been working with before. I didn't want clunky, forced and stylized, I wanted clean and simple. I played with combining letter forms into a little picture, and the five-stroke owl emerged.

I can even have him "stand" on the date, if I choose. And, it was a simple jump from the pen-stroke owl to a more formal version I can use for vector graphics if I want to sign those.

So, there's my owl.

Days 67, 98, 69: Sketchbook Catchup

Untitled (2007)
postcard sunset view, doodled in my sketchbook for fun and played with in Paint Shop Pro.

Feet (2007) Pencil sketch

Study of my son (2007) Pencil sketch
There, we're all caught up. it's all quickie art, sketch book harvesting, but I wanted to get caught up, even if nobody reads this. Personal commitment and all that.
If you are trying to figure out your style, or where your style is going, draw. Draw what you see. Cartoon it, or draw from life. The first one up there is a cartoon sunset. the feet and the boy are drawn from life, but the boy is still a little stylized, a little not-true, just enough to be real at first glance.
That's my blather for the day.
Monday, May 28, 2007
Pancakes from the Pet in the Jar
Note: A key ingredient in this recipe is sourdough. Go meet Herbert.
Sourdough Potato Pancakes
Get your sourdough out and feed it the night before. It should be the texture of stirred sour cream. If it's low, feed it for a couple of days ahead of time. You'll need 2 cups of good active sourdough for this recipe.
In addition to your sourdough, will need:
Mix the potatoes, sourdough, milk, eggs, sugar and salt thoroughly until creamy. Add the flour (or flour and baking powder). Mix until incorporated. Grease the pan and heat until hot.
When the griddle is hot, add the soda/water and stir well. IMMEDIATELY begin cooking pancakes. Serve as they come off the griddle, with your favorite pancake treatment.
Feeds 3-6 people, depending on level of hunger. Number pancakes depends on size of cakes you make.
Sourdough Potato Pancakes
Get your sourdough out and feed it the night before. It should be the texture of stirred sour cream. If it's low, feed it for a couple of days ahead of time. You'll need 2 cups of good active sourdough for this recipe.
In addition to your sourdough, will need:
- 1/2 cup cold mashed potatoes (cooled is fine)
- 2 eggs, beaten
- 1 cup milk
- 2-3 tbsp sugar
- 1 tsp salt
- 1 tbsp melted butter or oil
- 1 1/3 cups self-rising flour OR 1 1/3 cups all-purpose flour and 1tsp baking powder
- 1/2 tsp baking soda, dissolved in a little bit of warm water
Mix the potatoes, sourdough, milk, eggs, sugar and salt thoroughly until creamy. Add the flour (or flour and baking powder). Mix until incorporated. Grease the pan and heat until hot.
When the griddle is hot, add the soda/water and stir well. IMMEDIATELY begin cooking pancakes. Serve as they come off the griddle, with your favorite pancake treatment.
Feeds 3-6 people, depending on level of hunger. Number pancakes depends on size of cakes you make.
Saturday, May 26, 2007
Day 66: Night (late)

Night (1997?) Digital, used remixed and custom PSP tubes. Windows wallpaper.
I got sick of the Windows(tm) clouds-and-blue-sky wallpaper. I wanted something for me, so I made this.
Thursday, May 24, 2007
Day 65: Lightning

Lightning (1995 or 1996) Technical pen and sharpie over pencil on paper. Cut out and collaged onto black bristol.
This is really more of a draft than anything. I never really finished it, because my heart really wasn't in it.
There are clear problems with the anatomy, especially in her feet and legs. I was concentrating on the head and arms, so the legs were just kind of afterthoughts. I'm looking at reworking her, too.
I was working on this, or some other random sketch around the same time, during slow patches while waiting for customers to come to the register at the comc shop I worked in. A guy I recognized form conventions came to the register, I rang him up, and he noticed my work.
"That's really good. Do you take commissions? I'll pay you ten bucks for drawing."
"Depends. What of?"
"Joan of Arc."
"In battle? Or on trial?" I know where the drama is in the story, so I figure those are the two most likely requested vignettes.
"At the stake." Okay, ew, but that's dramatic, too.
"Uh, okay, come back tomorrow and I show you a rough. Something like that I can't work on at work. Rory's not paying me to draw for you."
I work up compositions on the bus home, do a real rough with recognizable people in it at home, and bring it in to work the next day. She's standing at the stake, defiant, brave, etc. Some scumbag is leaning in to light the fire, there's nebulous crowd at the back, clouds in the sky. It's still mostly just blocked in, though.
Guy comes back, looks at the sketch, and says "That's not what I want. Can you change it?"
I don't even want to ask, but ten bucks would have bought me two meals back then.
"Okay, how do you want it changed?"
Smiling, he says, "Can the fire be lit?" EW! But, yeah, MORE dramatic...
"Okay, come back later. Like I said I can't work on this here."
I change it. There's flames, scumbag has moved back away from the heat, I've drawn in outlines of smoke. She's still defiant.
He comes back, a day or two later, asks to see it. I show it to him while ringing him up.
He says, "Uh, can you change it again?" Inwardly I am beginning to have alarms go off.
"How?" ...
"Oh, can you make her naked, like the dress had burned off and on fire and dying and (pauses) liking it? Like she's ... giving in? Enjoying it? Oh, and make the ropes more obvious, like across her front." My lizard brian is running in circles of disgust and anger (ewewGRRRewewewGRRRewewew...), but I just give him a blank stare. Someone gets in line behind him.
"NO. Keep your ten bucks. I don't do snuff pictures. You'll have to find someone else to do it. Maybe at a con? NEXT!"
"Please? I really wnat it, I know you can do it."
"No. There's a line. I'm working here." And, fortunately, someone came over and asked him to move so I could do my job.
That whole experience really creeped me out in a deep, deep way.
In light of recent turns in the industry, I'm creeped out even more. This is apparently the new target audience for comics. And he wanted me to, essentially, take this and make it into this. And they've given him, and everyone like him, what he wanted.
Wednesday, May 23, 2007
PSA: Epiphanies
I wrote earlier today, when submitting a link to today's art:
And, reading that, when the reply came back to me, I had a chilling realization.
I've become afraid of my own darkness. My own sense of humor, which I thoroughly enjoy, my old attitude of "fuck 'em if they can't take my opinion," all of that has become a source of ... shame. Of fear. That's not right. What happened?
I think it speaks a lot to the state of our culture that, in order to become socially okay, to not have our kids taken away, to not be discriminated against, or be threatened in other ways, women (and minorities, and queer people) have to allow our independent spirits, our very souls to be crushed. In the name of adaptability, acceptability, peace. We compromised ourselves into corners. Well, I know I did. I'm certainly not alone.
That, right there, is what's wrong with the whole objectification of women in comics problem. It plays right into that. It helps create that atmosphere that causes the give-in-or-give-up mentality. Why do we have to be the ones who compromise?
I'm done with that. I quit. Things are going to get a little darker around here, maybe a little grittier. My style won't be different, really, but you'll see more of those pieces I've been sitting on.
Because I was afraid to show them.
I'll mark them as mature or offensive, but I won't hide them.
Not anymore.
I struggled with posting it. I had to get angry enough over something to even put that picture out there. I have to say that I'm afraid of the backlash, that I might never get a creative job again, etc.
But, if it puts another voice on the side of the WTF? Maybe it's worth it.
And, reading that, when the reply came back to me, I had a chilling realization.
I've become afraid of my own darkness. My own sense of humor, which I thoroughly enjoy, my old attitude of "fuck 'em if they can't take my opinion," all of that has become a source of ... shame. Of fear. That's not right. What happened?
I think it speaks a lot to the state of our culture that, in order to become socially okay, to not have our kids taken away, to not be discriminated against, or be threatened in other ways, women (and minorities, and queer people) have to allow our independent spirits, our very souls to be crushed. In the name of adaptability, acceptability, peace. We compromised ourselves into corners. Well, I know I did. I'm certainly not alone.
That, right there, is what's wrong with the whole objectification of women in comics problem. It plays right into that. It helps create that atmosphere that causes the give-in-or-give-up mentality. Why do we have to be the ones who compromise?
I'm done with that. I quit. Things are going to get a little darker around here, maybe a little grittier. My style won't be different, really, but you'll see more of those pieces I've been sitting on.
Because I was afraid to show them.
I'll mark them as mature or offensive, but I won't hide them.
Not anymore.
day63: Angry Girl (objectionable content)

Angry Girl (1995) Sharpie over pencil on paper. Some digital cleanup because the scan was bad and I can't find the original right now.
I did this as the flier art for an Accustomed To Nothing gig, in 1995 or so when I worked with the band's manager at Comic Relief in Berkeley CA. Brian asked, I drew stuff all the time, so I did it, and I got to go to the gig too. The flier had a big chunk of text over the middle finger so people wouldn't yank them from where they got posted, but this is the original art, no censorship.
I struggled with posting it. I had to get angry enough over something to even put that picture out there. I have to say that I'm afraid of the backlash, that I might never get a creative job again, etc.
But, if it puts another voice on the side of the WTF? Maybe it's worth it.
I'm posting this particular piece today because things are getting weirder than usual with regard to how women are presented in comics. Like, hentai-weird, in non-brown-wrapper packages. Super girls have always been treated like the cheerleaders of the super world before now, but lately it's become ridiculous, and they are being treated, routinely, like softcore porn actresses in bad victimization storylines. It wasn't this bad in the 1940's.
Women of the comic world are getting more vocal than they had been, and it's not like the women who write, draw and edit comics have been exactly silent on the subject. The ire has always been there, but now it's getting more organized. I don't really count myself in with this, since I never wrote a comic, or got beyond storyboarding one, and working up character designs, but I've always been a reader. Since I can remember. I used to read comics at recess in the fourth grade. I loved MAD, I read Xmen and Batman and Sgt Rock. I didn't like the girly comics. I'm such a tomboy that some of my male friends would forget there was a girl around.
Hey guys? I like the gritty, real-life tone that a lot of comics have taken. I love satire, the worse, the better. HOWEVER - this is a big however - gritty does not equal violently porny. Ever. If you can't wrap your head around that, the gesture above is for you.
Thanks.
Visceral reaction on my part follows:
Strong women can be strong without the necessity of their getting spanked by some bad guy in spandex, honest. It won't make your dick shrink to read about it. Grow the balls to buy some hentai books and stop trying to make regular comics into porn. I swear nobody will laugh at you if you by a copy of Legend of the Overfiend.
Tuesday, May 22, 2007
day 62: Design interlude

Splash image from 2000 incarnation of my personal web page.
Digital collage. Originally presented as a series of animations, beginning with a sealed envelope.
Sunday, May 20, 2007
PSA: It's not about me, it's about all of us.
I don't know if you know who Tom Artis was, but he died recently after a long illness. His family is destitute. He was part of several comic books I read and enjoyed.
There's a fund to help his family. However many people read this, please send a little bit.
There's a fund to help his family. However many people read this, please send a little bit.
More Bobby
No picture today, but the curvature created by the shortrow shaping on Bobby is coming out perfectly. I'm aiming to match the curvature of the original garment, and I'm spot on.
If anyone has 3 or 4 balls of Knitpicks Essential in 2 colors just lying around, and wants to do a sporadic knit-along with my developing pattern, here's the part that I've worked out (not in clear modern knitting language - I took this straight from my notes):
Gauge swatch: 44 sts x 48 rows over 4x4 inches, knit in 1x1 rib on size 1 KnitPicks circulars (straights are ok, too, i just don't have any plain straights in 1). 11 sts by 12 rows over average square inch.
Using a long-tailed cast on, cast on 136 sts.
Work 10 rows 2x2 rib over all 136 sts.
Work 1 row 1x1 rib without shaping.
Work 80 sts 1x1 rib, turn (use your favorite shortrow method).
Work 34 sts 1x1 rib (continue in 1x1 rib) turn.
Work 38 sts, turn.
Work 40 sts, turn.
Work 44 sts, turn.
Work 48 sts, turn.
Work 50, turn.
Work 52, turn.
Work 56, turn.
work 60, turn.
work 64, turn,
work 68, turn.
Keep going, working 4 sts past your last turning point on the row on the needle each time, until you are back to the edge of the work. Work 15 rows (continue in 1x1 rib) and begin side shaping.
I haven't written the side shaping. Tune in next time, probably Wednesday.
The sample is a 12-18 month size, roughly 1T. I'll be working out patterns for all standard CYC infant sizes once Bobby's all written up. 1x1 rib = knit 1 purl 1, so you know I'm not using some bizarre shorthand.
You can also use any other fingering weight sock yarn, I have worked up swatches in Wildfoote and Dancing, and the gauge is similar. If you want to try this in other yarns, let me know how it works out.
Days 61 and 62: Clipangels


Both untitled (2001)
Victorian scraps, scanned and recolored digitally.
I made these for my christmas cards in the year 2001. This is more design than art, in my view, but they are pretty cool.
Day 60: Net

Net (2000?) Digital illustration, done in Fireworks. Incorporates text of a poem as a design element.
Thursday, May 17, 2007
Days 57 and 58
Urgent personal business interferes with art. I was busy, and away from the computer all day.
Day 59: Creative Hands

Creative Hands (1999) Digital collage.
This was my favorite portion of an attempt to communicate the feeling of the creative process though symbols.
Monday, May 14, 2007
Day 56: IF: Citrus

Limonade (2007) Digital. Mouse-drawn in Illustrator.
Another late-ish entry into Illustration Friday. Intended as a spot illo, to the theme "Citrus."
Bobby

Bobby is a free pattern in progress. It's based on a sewn (from machine-knitted yardage) cotton/rayon baby romper that belonged to my late uncle when he was an infant in the early 1940's.
I'm working it up in Knitpicks Essential, since I cannot find an acceptable substitute for the laceweight cotton 3ply with one rayon ply, and also because superwash wool will withstand baby. I originally started with two skeins of Wildfoote, but it's not as soft as Essential, so those will probably get used to to make a matching (nearly matching) hat and sock set. Eventually I'll try a cotton version, but by then my baby won't be a baby anymore!
The curves at the bottom are to be shaped with short rowing, probably japanese shortrows. This version is worked flat, front, back and sleeves, and seamed (or seamed as you go...), then the buttons and snap tape are sewn on. It's actually a pretty simple little item, the only thing about it that makes it difficult is the gauge. It's worked on size 1 needles, in 1x1 rib, with edgings worked in 2x2 rib.
I'm thinking I might want to write an in-the-round version. I started out with that in mind, but that wast started in the Wildfoote, in stockinette, with 1x rib edging, and I was unhappy with the yarn as well as the way the stockinette behaved vis what I intended.
For the full pattern, keep an eye here. I'll post a link when I've got it done.
Sunday, May 13, 2007
Saturday, May 12, 2007

Friday, May 11, 2007
PSA: day 51
There was no day 51 post. I plead hot, humid, awful weather that made my computer shut down, followed by a trip to the ER for my kid.
I was pretty uncomfortable, too, but I did manage several more sketches. I've been working on some copyleft illos for Wikipedia, and that's been kind of draining. But I'll try to get more art up.
I think I might even be able to pull something out for IF this week. We'll see.
I was pretty uncomfortable, too, but I did manage several more sketches. I've been working on some copyleft illos for Wikipedia, and that's been kind of draining. But I'll try to get more art up.
I think I might even be able to pull something out for IF this week. We'll see.
days 52 and 53: Foodie Glamour Shots


(1999) Digital photographs, retouched and digitally manipulated.
Two glamour shots I did for the cookbook project I mentioned on day 9.
One's vegan, and one isn't. I can't recall now which is which.
Tuesday, May 08, 2007
Day 50: Fashion

Fashion (1999) Quickie digital painting
Desktop background, done in a half hour or so in fireworks for fun. Liked it enough to keep around for 8 years.
Monday, May 07, 2007
Day 49: Doubletake versions

Doubletake (original drawing) (1987)Gouache over technical pen over pencil on bristol. Pencils erased prior to coloring. Coloring done about 1990.

Double-negative (1995?) Xerox of uncolored original, cut out with an xacto and glued down to a black background.
I've always liked this image, so I've played with it a few times over the years. I colored the original inked drawing a few years after I made it, and had made xeroxes before that, in case I wanted to play with the image. The negative version is one of those playful versions.
Sunday, May 06, 2007
days 47 and 48: Sketchbook

Ink study of baby (2007) ink on sketch paper, no pencils.

Girl's face (2007) inked and colored sketch of a girl's face
Two small drawings from my sketchbook.
PSA: weekends I think I'll be posting both days at once, so I can spend time away from the computer.
Friday, May 04, 2007

Thursday, May 03, 2007
Day 45: Salamander

This is a character study for the illustrations I'm doing for a children's story I'm writing. I'm still deciding on the format - graphic novel, picture book, or novel with incidental illos. I suppose it depnds on how much of the story I want to paint, and how much to write.
Wednesday, May 02, 2007
Day 44: Green Fairy

Green Fairy (2001) Digital painting.
A simple little digital painting inspired by the shape of a peice of clipart.
A Weighty Task
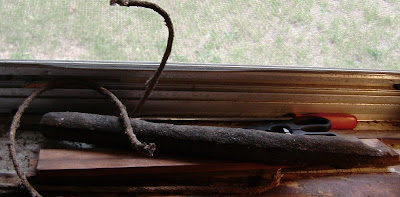
Spring has sprung. It's hot. But not really hot enough for air conditioners, unless we don't open the windows. Which, mostly wasn't possible, so we had to borrow an a/c unit from my mother. I'm putting screens into the storm windows right and left, but getting all the windows open, and keeping them that way is a nightmare. We ran out of short pieces of wood.
What's wrong with the windows, you might ask? You didn't ask. Well, I'll ask for you, in the interest of moving us all along.
The windows are quite well preserved, except for a couple in the dining room bay, but nearly all the sash cords have gone. All but one set, on the only window that apparently never got sunbaked. That window has been open for weeks, since it's now indoors, on both sides, and opening it does us no good. I replaced a set of cords in my son's bedroom, and I think I replaced a set in the back room (hereafter referred to as the Hole, until it's cleared and made into the dressing room), last summer.
Some progress, but not enough. No openable windows in, say, the kitchen, or the dining room, or the living room. We had used up the little bits of wood propping open our bedroom windows. So sleeping was possible. It was unbearable, even with fans everywhere, and mom's little borrowed a/c unit. Too hot.
So, I started the interminable task of pulling out bottom sashes and prying out access boards yesterday. I started with the other window in my son's room, so he could get actual cross-ventilation, and while I was working on it, I decided to take photos. For everyone else, of course. I really don't need a picture of this to remember it:What's wrong with the windows, you might ask? You didn't ask. Well, I'll ask for you, in the interest of moving us all along.
The windows are quite well preserved, except for a couple in the dining room bay, but nearly all the sash cords have gone. All but one set, on the only window that apparently never got sunbaked. That window has been open for weeks, since it's now indoors, on both sides, and opening it does us no good. I replaced a set of cords in my son's bedroom, and I think I replaced a set in the back room (hereafter referred to as the Hole, until it's cleared and made into the dressing room), last summer.
Some progress, but not enough. No openable windows in, say, the kitchen, or the dining room, or the living room. We had used up the little bits of wood propping open our bedroom windows. So sleeping was possible. It was unbearable, even with fans everywhere, and mom's little borrowed a/c unit. Too hot.
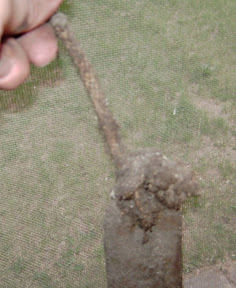
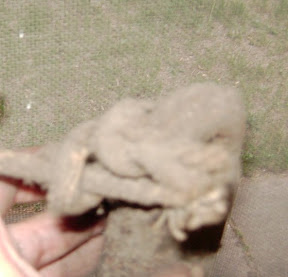
Yum. It's like a big metal poop, but covered with 80 years of dust and dead spiders. Just makes you want to do this, doesn't it? Actually, looking at this, you can kind of see why people just quit replacing the cords.
Let's start at the beginning. It's much less disgusting.
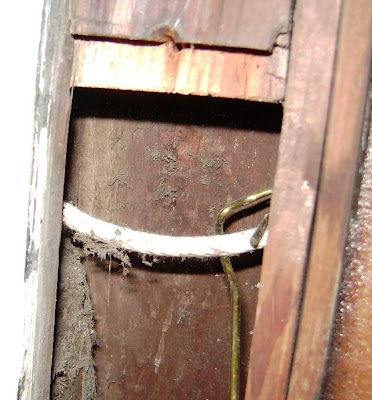
These instructions are for a "modern" house with repair access ports designed into the frames. You can tell if you have these by opening the window and looking for joints and/or screws in the tracks. Also, even though all our windows are double-hung, the upper sashes are painted into place and their cords are (unsurprisingly, as they were protected from the sun) in fine shape, so we're only working with the lower, inner sash and its cords. Pulling both sashes, stripping and restoring full sash movement is a whole other kettle of lead paint chips.
If you have a house that doesn't have this modern convenience added to the traditional double-hung window, you'll have to pull the trim to access the channels.
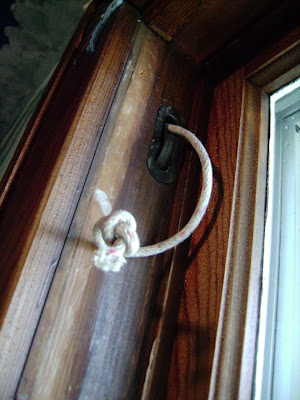
Get real replacement sash cords, not nylon (or any other synthetic rope - it won't hold the knots well at all) or cheap cotton cord (not strong enough). It's fairly high-test, and is treated with a very grabby sizing to help it keep the knots. You'll also need a hammer, a large flathead screwdriver or small prybar, a screwdriver for removing and replacing any screws, and a cutting implement. Another thing you want is a long stiff piece of wire with an open hook at one end - a repurposed coathanger is perfect. More on this later.
First, pry off the stop moldings, gently, and set aside. If there is a single cord, or if you are replacing cord before it gives way, cut the cord now. Grasp the lower sash firmly and pull it straight out and set aside, somewhere you won't step into or kick it. I know you won't and you know you won't, but do you want add a trip to the hospital and the home store, plus recreational re-glazing to your day?
Now, if there are screws holding in the access panels, rather than just friction and the pressure of the stop molding, remove them and put them somewhere safe, like a cup. You'll probably find some evidence of previous repairs, as I did. Only two of the prymarks I left behind were mine - the other dozen were already there. Clearly the cords had been replaced before.
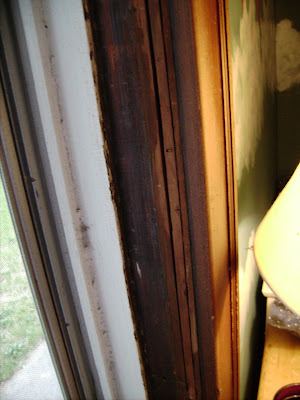
Start by prying carefully. There might be a small nail securing the panel (these are under the window trim, where they occur, at my house, which meant either pulling the trim -all of it- or hacksawing the nail). Remove or cut the nail, depending on your level of commitment. The edge that is secured by this mail occurs under the stop moldings at my house, so I just cut the nail. Continue prying gently until the panel pops out.
Let's start at the beginning. It's much less disgusting.
These instructions are for a "modern" house with repair access ports designed into the frames. You can tell if you have these by opening the window and looking for joints and/or screws in the tracks. Also, even though all our windows are double-hung, the upper sashes are painted into place and their cords are (unsurprisingly, as they were protected from the sun) in fine shape, so we're only working with the lower, inner sash and its cords. Pulling both sashes, stripping and restoring full sash movement is a whole other kettle of lead paint chips.
If you have a house that doesn't have this modern convenience added to the traditional double-hung window, you'll have to pull the trim to access the channels.
Get real replacement sash cords, not nylon (or any other synthetic rope - it won't hold the knots well at all) or cheap cotton cord (not strong enough). It's fairly high-test, and is treated with a very grabby sizing to help it keep the knots. You'll also need a hammer, a large flathead screwdriver or small prybar, a screwdriver for removing and replacing any screws, and a cutting implement. Another thing you want is a long stiff piece of wire with an open hook at one end - a repurposed coathanger is perfect. More on this later.
First, pry off the stop moldings, gently, and set aside. If there is a single cord, or if you are replacing cord before it gives way, cut the cord now. Grasp the lower sash firmly and pull it straight out and set aside, somewhere you won't step into or kick it. I know you won't and you know you won't, but do you want add a trip to the hospital and the home store, plus recreational re-glazing to your day?
Now, if there are screws holding in the access panels, rather than just friction and the pressure of the stop molding, remove them and put them somewhere safe, like a cup. You'll probably find some evidence of previous repairs, as I did. Only two of the prymarks I left behind were mine - the other dozen were already there. Clearly the cords had been replaced before.
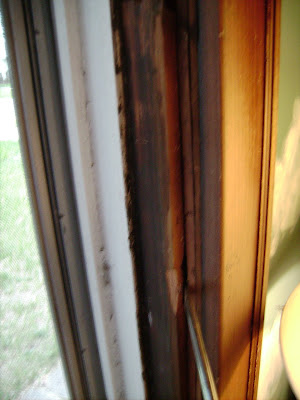
Start by prying carefully. There might be a small nail securing the panel (these are under the window trim, where they occur, at my house, which meant either pulling the trim -all of it- or hacksawing the nail). Remove or cut the nail, depending on your level of commitment. The edge that is secured by this mail occurs under the stop moldings at my house, so I just cut the nail. Continue prying gently until the panel pops out.
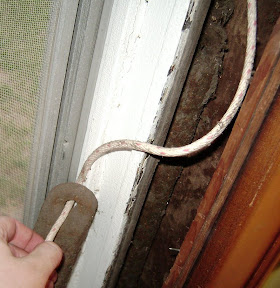
You may have to pull it out after the leading edge is free, since the center stop molding is still there. One edge is often under that. Once it's out, we get to do the fun part.
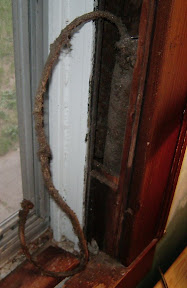
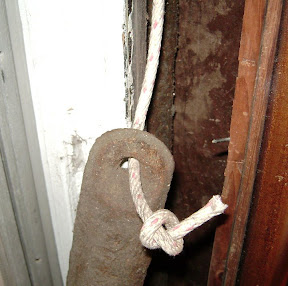
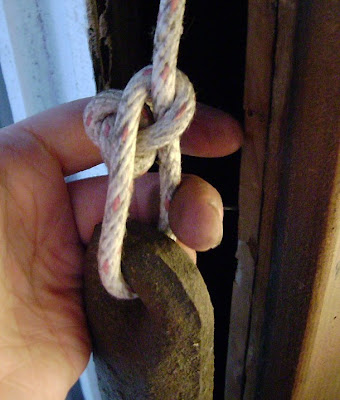
Deeee-lish-us. Reach in there and grab the weight and pull it out. Wear gloves if you like - our weights are iron, but as often, they can be lead. Look at the knot configuration, if you can. You probably can't, if it looks anything like the example weight does:
Let's wrestle that a little bit. This better? No?
Well, okay, I'll demonstrate the not-so-arcane-after-all knotting technique after we get the new cord through the pulley and out where we can reach it. Measure the length you'll need the cords - measure how far down the sash the cord groove goes, plus the length from the top of the pulley to the top of the weight (if you stood it up on the windowsill), and the cord should be long enough. Add three inches if you are worried.
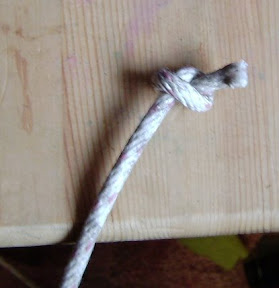
Tie a plain old half-hitch close to one end, and pull it as tight as you can.
If you are really lucky, the cord will just snake down the inside and fall out the opening. However, this is unlikely, so use that long wire hook to fish around up there and pull the cord through.
Tie a plain old half-hitch close to one end, and pull it as tight as you can.
Then thread the other end through the top of the pulley, push every bit through until you get to the knot.
Take the end of the cord and thread it through the hole in the weight. You should have enough slack to do this pretty easily, but not so much that the weight can lie on the windowsill while you work. I propped the weight up in the outer slide channel and the worked fine.
Now, tie another firm half hitch close to the end.
Now, tie another firm half hitch close to the end.
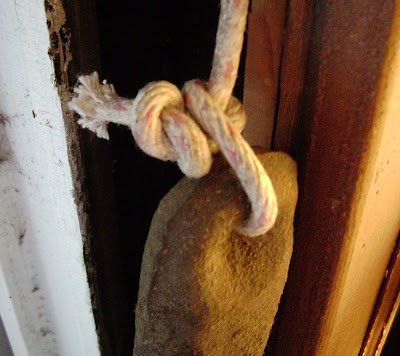
This would be the not-as-arcane-as-you-think knotting method. Next, pull the knot up, wrap it around the cord, and "button" it through the resulting loop. Step 1:
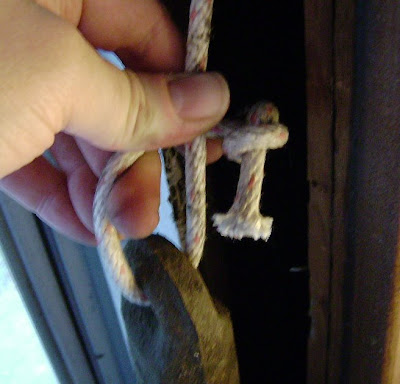
Step 2:
Then pull tight to secure it.
Put the weight back in the weight channel, and close up the access port. Repeat on the other side. Get the sash, and remove any remaining old cords from the cord grooves. Get another person to hold the sash (or prop it on something secure), make sure you've got the right side of the sash facing in, pull the knots down from the pulleys and tuck them into the holes for the knots, then push the cords into the grooves. The sash should now be hanging freely in the window, and shoudl slide easily up and down. Re-install the stop moldings (if you pulled the trim, re-install that, too), and you're done.
Subscribe to:
Posts (Atom)