Original post: A mystery in a plastic bag
I have been in correspondence with a descendant of the lady who made these things. They have been sent on to him and he is going to share them with his cousins in a few weeks when he visits. Perhaps, then, he might learn how these things came to sit in a thrift store, instead of in a box of family treasures.
If I am fortunate, I might find out as well.
Monday, June 03, 2013
Wednesday, April 10, 2013
A mystery in a plastic bag
Today was a glorious day of recycling and thrift shopping. I rescued some vintage sewing machine ephemera, a fantastic 1930's cookbook chock full of handwritten notes and insertions, a couple of hats I plan to make into other hats, some antique compacts, a basket of real actual linen linens and ... a mystery.
The mystery is this: a gallon sized ziploc bag containing what purports to be a family heirloom linen towel brought over from Germany to New York in 1849 by a woman named Fredericka Dammann (née Berger).
This treasure was on the "Buy before it gets thrown out" table at the consignment thrift place. It cost me 2 bucks. I was fishing for cheap unwanted vintage linens, because I love them and want to use them and my budget is small. I flipped over an unassuming plastic bag, read the abandoned family history within and was filled with sadness. I wondered how it ended up there.
I felt compelled to buy it and find out more and maybe get it to a descendant, or document it for the local historical society. Or at least make sure it isn't lost to time. This was precious. It should still be precious.
Inside this ignominious package is the towel with its darkly yellowed note, and a pin that once held the two together, a very, very worn smaller piece, with its own pin and very yellowed note simply reading "More German Linen," and another, longer note, with more history that hints at some other items that are now lost.
The towel (22.5" x 44") is exquisite, elaborately handwoven damask in a warp faced stripe, 1" wide alternating with 1" bands of 4-thread warp faced/weft faced pinstripes and a selvedge treatment of a 2" wide band of 8-thread pinstripes.
The ends of the towel have a similar treatment to the selvedges, producing a checked effect, and are hand hemmed with tiny, perfect hand stitches holding down a 3/16" hem.
One has clearly been used more than the other as it is a bit more worn and shows evidence of repairs, and this corresponds to the wear holes on the end of the towel.
The other end is nearly new, with a tiny fold on the tape.
There is a tiny cross-stitched monogram in the bottom left corner that is so faded I almost missed it, but it can be seen if the towel is held up to the light.
It matches the monogram on the second piece.
The smaller piece of linen (20.5" by 17") has lost two of its hemmed edges and is finer plain weave linen, transparent enough to read text through, either from use and time or intention.
Its monogram, in the upper left corner, is still clear. Finely cross-stitched in what is now light brown thread, in a delicate script, it reads "FB."
The back shows how carefully the stitching was done.
The edges are a worn selvedge, two raw edges where hems or more cloth tore away, and the remaining 1/2" hem.
The hem is as carefully hand stitched as before, except where it wore open and was mended less gracefully.It may have been a hankie, or a napkin. Possibly it was part of something larger.
I believe this was entirely Fredericka Berger's own work, most likely made under direction of her mother, a tutor or at a young ladies' finishing school for her own trousseau, depending on her social station. The linen thread is hand spun. The weaving, while fine, is clearly student quality, as the remaining selvedge on the second piece is a bit uneven. The hand stitching, however, is exquisite. Young eyes and small hands have an easier time with tiny hand stitches.
The note from the towel reads "This is a German linen towel brought from Germany in 1849 by grandparents Wm and Fredericka (Berger) Dammann" and is pinned on the top left corner where it is folded with the bottom left corner, piercing both layers.
The third note is falling to pieces and will require conservation. It is in the same delicate handwriting as the other two notes, but in pencil. It reads:
"Minette Koch, your grandmother born of Fredericka Berger and Wm Dammann came from Germany in 1849 to New York. Grandmother Minette Koch was born in New York in 1850 and married Wm. Koch in 1870."
"M.R. beaded on one of these pairs of socks stands for Minette Ros- [tear obscures last letter], maiden name of Wm. Dammann's mother who never came over from Germany."
There are no socks in the bag.
So, this is my mystery. Or, really, someone's mystery. I just found it and brought it home.
Added Information:
German Emigration to America
History of linen weaving
 |
| A mystery package |
This treasure was on the "Buy before it gets thrown out" table at the consignment thrift place. It cost me 2 bucks. I was fishing for cheap unwanted vintage linens, because I love them and want to use them and my budget is small. I flipped over an unassuming plastic bag, read the abandoned family history within and was filled with sadness. I wondered how it ended up there.
I felt compelled to buy it and find out more and maybe get it to a descendant, or document it for the local historical society. Or at least make sure it isn't lost to time. This was precious. It should still be precious.
 |
| Note pinned to smaller linen item |
Inside this ignominious package is the towel with its darkly yellowed note, and a pin that once held the two together, a very, very worn smaller piece, with its own pin and very yellowed note simply reading "More German Linen," and another, longer note, with more history that hints at some other items that are now lost.
 |
| Damask stripe pattern |
 |
| One end of towel |
The towel (22.5" x 44") is exquisite, elaborately handwoven damask in a warp faced stripe, 1" wide alternating with 1" bands of 4-thread warp faced/weft faced pinstripes and a selvedge treatment of a 2" wide band of 8-thread pinstripes.
 |
| Selvedge band |
 |
| Detail of hand stitching at hems |
 |
| Hem pattern cross striping forming checks |
 |
| One end of the towel is very worn and has small holes, possibly from being hung on a hook. |
 |
| There are two handwoven plainweave linen tapes for hanging, one at each end. |
 |
| Detail of unused hanging loop |
 |
| Faded monogramming |
 |
| Backlit, the faded and worn monogramming is visible |
 |
| Smaller linen square held up to light, showing handspun threads and transparency |
 |
| Monogram as seen when I first removed the second piece from the bag |
 |
| back of monogram on napkin |
The back shows how carefully the stitching was done.
 |
| worn and uneven selvedges |
 |
| A section of the selvedge that is still in good condition |
 |
| Worn selvedge, looks like there might be some slight mending |
The edges are a worn selvedge, two raw edges where hems or more cloth tore away, and the remaining 1/2" hem.
 |
| This portion of hem looks original, the tiny whipped hem stitches are so finely done as to be nearly invisible |
 |
| This area has been mended with a coarser running stitch in a yellower linen thread. |
 |
| Transition of original hemstitching to mending |
I believe this was entirely Fredericka Berger's own work, most likely made under direction of her mother, a tutor or at a young ladies' finishing school for her own trousseau, depending on her social station. The linen thread is hand spun. The weaving, while fine, is clearly student quality, as the remaining selvedge on the second piece is a bit uneven. The hand stitching, however, is exquisite. Young eyes and small hands have an easier time with tiny hand stitches.
 |
| Note pinned to towel |
The note from the towel reads "This is a German linen towel brought from Germany in 1849 by grandparents Wm and Fredericka (Berger) Dammann" and is pinned on the top left corner where it is folded with the bottom left corner, piercing both layers.
 |
| Pencilled note, showing the delicate state of the paper |
The third note is falling to pieces and will require conservation. It is in the same delicate handwriting as the other two notes, but in pencil. It reads:
 |
| Pencilled note, reassembled and scanned |
"M.R. beaded on one of these pairs of socks stands for Minette Ros- [tear obscures last letter], maiden name of Wm. Dammann's mother who never came over from Germany."
There are no socks in the bag.
So, this is my mystery. Or, really, someone's mystery. I just found it and brought it home.
Added Information:
German Emigration to America
History of linen weaving
Thursday, December 15, 2011

It's been 4 years of near-total inactivity on my house blog, but there wasn't much to report. We've been on hiatus, my husband has been deployed a few times, and we are finally getting to get back to work on the old girl.
I've spent the intervening time researching things and making plans, and I have figured out a number of things about this house. Not one of those things, and none of my extensive research, has given me anything like an answer as to which architect or kit company she came from. Not a bit, despite having practically had a love affair with the online texts section of the Internet Archive, and spending way too much time with Google Books. So, in the spirit of warming up a cold project and slowly getting it into gear, I am going to ask you for some help. Here's my question for you:
Does anyone out there recognize this floorplan? I have yet to find a house with a
Here's the only photo I have been able to find prior to the changes to the porch:
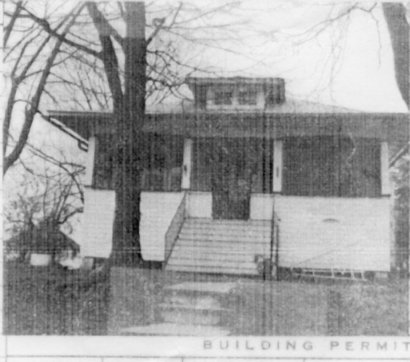
What we do know:
- The county tax assessor has a single sheet of manila with a tiny photo stapled to it, which I have been told dates from the late 1960s or early 1970s. The build date on the house, according to this document, is 1925. However, as records are incomplete, I have been told that could simply be a sale date, or the date the property record was recorded in the county office. Nobody knows.
- The younger daughter (Edith Heppe) of the family that built it visited the late former owner of the home about 15 years ago, and a statement about the house was written down from her childhood memories. We have this statement and I have transcribed it here.
- Mrs. Heppe remembered it was built by her father, and her parents moved to Centralia in 1921, so it had to have been built before that time.
- It's got Sears hardware throughout, and all the original millwork is directly out of the Sears millwork catalog.
- It originally looked rather like an Aladdin, if you go by that little black and white photo. But it does not match any recognizable Aladdin plan, or even a footprint of any similar style of home, that I have yet found. Also, the interior millwork and hardware and NOT Aladdin.
- I've found a similar footprint in Wards and Chicago House Wrecking company catalogs, but nothing like this plan or style in combination with the footprint.
- It's got an odd arrangement of den/living room/dining room that is indicative of an earlier house, so really, the latest I would put it at is 1914.
In other news, I finally know what to do with the back bedroom. More on that, and the kitchen remodel, later.
Monday, August 15, 2011
Teaser: Saffron, a shawl for leaving the Maiden House

Thanks go out to my volunteer tech editor and the brave test knitters in the BigDamnKnitters group at Ravelry.
This pattern will be a free PDF download, available through Ravelry and my document shelf at Scribd. I will make announcements here, at livejournal, and on Ravelry.
Thursday, June 09, 2011
Pinwheel Striped Apples

These are what we call "Pinwheel Apples" around here. They are, essentially, sliced apples reassembled using peanut butter as glue. These are great easy snacks for mom to make, or for kids to make with some adult help (like slicing).
They look really festive if you choose two nearly identical apples of different colors, like these:

To make them yourself, you will need:
- 2 apples as close in shape and size as possible
- nut or soynut butter
- a cutting board
- a sharp knife
- a melon baller
- something to serve them in ( I like to use colorful Ikea kids' bowls)
The first step is to wash the apples, then dry them and cut them in half along the core:

Using the melon baller, cut out the cores. Using the knife, cut out the stems and any remaining flower bits at the bottom of the apples.


Get rid of the compostables, and slice the apple halves into fairly standardized slices (a little variation is okay). Get out your nut or soynut butter.
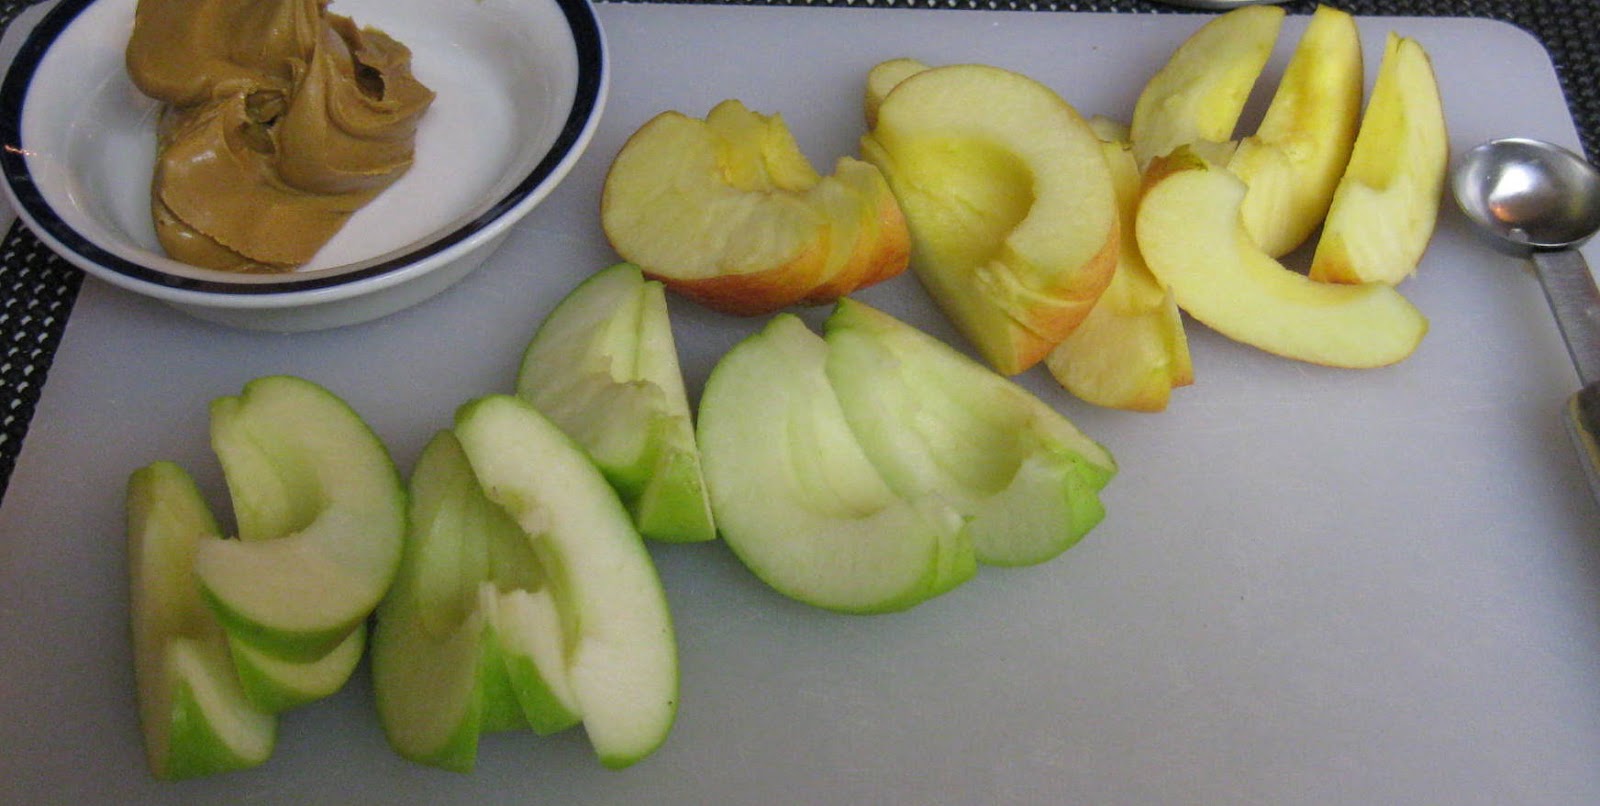
Hold one hand cupped, and start reassembling an apple in your palm, using slices of alternating colors:

Add a spoonful of nut butter, and keep adding slices until you get a fairly complete apple. You should be able to maintain the alternating stripes of color all the way around, if you were careful about cutting your slices.

Press the completed apple together with cupped palms to help it hold its shape and set in a bowl or saucer to serve. If it's hot out, refrigerate for an hour or two before serving to help them hold together. Garnish with berries or other fruit (orange slices are also awesome).

Enjoy!
Tuesday, January 11, 2011
The Original Reason for My Hiatus...
...was that I was doing a site design. This one:

Heaven's Pavement is a promotional web site for the book of the same title. I coded it from scratch, and spent quite a bit of time with the site's owner getting the art just right and making the layout perfect. We went live right around Veterans' Day.
I didn't want to take time out from the design process to edit and post anything. Things began to gather. I got intimidated. I put it off a couple of weeks, with the very best of intentions.
And then, it was the Thanksgiving holiday. As everyone with small children knows, school holidays are not holidays at all for parents. For us, it was a full week of nonstop parenting and turkey wrangling, the latter of which went very well indeed, for my very first turkeybird in over 16 years, and the very first I have cooked with my spouse.

I also made my usual pumpkin "pie" in a springform pan. This year, due to developing food sensitivities, it was eggless. It came out quite well, except that Eggless Pumpkin Cheesecake Pie needs about 48 hours, rather than 24, for the spice flavors to develop properly. It was great the day after Turkey Day and even better the third day.

Recipe for Eggless Pumpkin Cheesecake "Pie"
Ahead of time:
Prepare and bake your favorite baked pastry crust in a 9" springform pan. I make a recipe for an 8" double crust pie , then put the crust bottom in and cut strips the same width as the pan is deep. Set them in the pan, sealing the seam with a little water, and crimp lightly close to the top. Line with aluminum foil folded lengthwise into a strip as deep as the vertical wall to prevent slumping and prick the bottom or weight. Pre-bake according to your crust recipe. Cool before using.
Ingredients:
After that, I was just out of the groove. I have a couple dozen posts queued up, and partially edited, but I had let everything slide. Excuses aside, I think I'm back now!

Heaven's Pavement is a promotional web site for the book of the same title. I coded it from scratch, and spent quite a bit of time with the site's owner getting the art just right and making the layout perfect. We went live right around Veterans' Day.
I didn't want to take time out from the design process to edit and post anything. Things began to gather. I got intimidated. I put it off a couple of weeks, with the very best of intentions.
And then, it was the Thanksgiving holiday. As everyone with small children knows, school holidays are not holidays at all for parents. For us, it was a full week of nonstop parenting and turkey wrangling, the latter of which went very well indeed, for my very first turkeybird in over 16 years, and the very first I have cooked with my spouse.

I also made my usual pumpkin "pie" in a springform pan. This year, due to developing food sensitivities, it was eggless. It came out quite well, except that Eggless Pumpkin Cheesecake Pie needs about 48 hours, rather than 24, for the spice flavors to develop properly. It was great the day after Turkey Day and even better the third day.

Recipe for Eggless Pumpkin Cheesecake "Pie"
Ahead of time:
Prepare and bake your favorite baked pastry crust in a 9" springform pan. I make a recipe for an 8" double crust pie , then put the crust bottom in and cut strips the same width as the pan is deep. Set them in the pan, sealing the seam with a little water, and crimp lightly close to the top. Line with aluminum foil folded lengthwise into a strip as deep as the vertical wall to prevent slumping and prick the bottom or weight. Pre-bake according to your crust recipe. Cool before using.
Ingredients:
- 3.5 cups cooked pumpkin
- 1 can evaporated milk
- 3 tbsp cornstarch + 1 tbsp of egg replacer (or 4 tbsp cornstarch)
- 1 tbsp soy lecithin
- 1 package cream cheese
- 1/3 cup powdered milk
- 1tsp "pie spice"
- 1/2 tsp allspice
- 1/2 tsp cinnamon
- pinches of ginger, nutmeg mace to taste
- 2 tsp vanilla
- 1 cup brown sugar
Instructions:
- Preheat oven to 450 degrees F.
- Mix all dry ingredients, then beat in all wet ingredients.
- Pour into your pre-baked shell, and set it on a cookie sheet.
- Place in oven, and bake for 25 minutes at 450 degrees F.
- Turn oven down to 350 degrees F for an hour and a half. Pie is done when a toothpick can be inserted and pulled out fairly cleanly.
- Cool on the counter in pan.
- Cover and refrigerate 48 hours.
Serve with whipped cream.
After that, I was just out of the groove. I have a couple dozen posts queued up, and partially edited, but I had let everything slide. Excuses aside, I think I'm back now!
Tuesday, August 03, 2010
Handouts are up at Scribd!
Exactly what it says! Check the widget in the sidebar for the current list of available handouts.
Monday, August 02, 2010
Frankenblogging Part 7: Medieval veils and other headwear
Author's note: The Frankenblogging feature is a republication of older content from my former personal webpage, with some annotations. It occurs every Monday morning. This one is late! My apologies.
Today's installment is made of a couple of pages from the old site. The first section is the short opinion/advice piece that grew into a larger research project, on 12th Century French women's court headwear, and the second is a set of pieces I wrote about buckram and other materials in making historic hats, closing with a tiny little thing I said once about straw hats.
A short observation on early veils
The early veil (think Norman Conquest - there are two ladies on the Bayeux tapestry wearing something that looks like this) seems to have been a smaller version of the roman matron's veil.
It's a large rectangle, worn by laying the centre of the long side over the head, crossing the ends over the front of the throat, and tossing them over the shoulders. No bands seem to have been worn with this style of veil, but keeping it in place would have definitely been helped by pinning it to braids wrapped around the head. It's very warm, as well, so if you live in a hot place, make it of thin cotton or linen, with a slightly open weave, to let air pass through. For winter, make it of wool or heavy soft silk.
A good place to get inexpensive, high-quality, premade veils (my early veil is exactly this item) is at Dharma Trading Co. They carry them in silk and cotton (though they call them sarongs).
Buckram and Elizabethan Hats
This is OLD, I wasn't as much of an expert as I thought I was, and this wasn't EVER my main focus of research. I can MAKE hats, and I was trained in modern millinery techniques (i.e. 1800s and more recent). Please have a look at the websites of those who do specialize in this period, like Sarah Goodman and Drea Leed.
I trained with a professional milliner (who is now retired) making reproduction hats, using traditional techniques and materials. I've done theatrical costume and I've also been researching and making documented period costume for over 10 years. Much of what is given below is based on my experience with the various materials.
That last sentence is pretty accurate. It's practical advice on using modern materials, NOT AT ALL a piece on making authentic reproductions. Keep that in mind!
Period Usage ofBuckram No, not really about buckram at all. I didn't find any. See my cautionary note, above, PLEASE! This is another case of "Ive got a BOOK! Look! Expert! ME!" syndrome.
Period Usage of
Sigh.
I have checked my copy of _Queen Elizabeth's Wardrobe Unlock'd_ (Arnold), and it seems that buckram was used in giving body and shape to clothes (as Pellon interfacings are used now), but not to hats, during Elizabeth's time. Stiff felt was used for shaping hats, which would then be covered with the fashion fabrics. I suggest Arnold's _Patterns of Fashion_ for more information (with photos of construction details on an existing example) on at least one hat (my copy is now gone and I have been unable to replace
it). Also, try the Elizabethan Costuming Page, as it focuses more on this period than I do, and may
have more information on where to look. The main downside to felt is that millenery felts are fairly expensive.
Modern Buckram
Modern buckram is made in a similar way to period buckram. 10-years-ago me seems to know SO MUCH about things I haven't really researched personally. Please ask someone who really knows what they are talking about! "Buckram" basically is now defined as a coarse-woven cloth stiffened with starch, and the meaning of the word has not changed very much over the intervening time, save that in the 16th c it also referred to the unstiffened cloth. If you want to use it for hats, you should look for and purchase millinery buckram as it is superior for hatmaking. It should, in any case, be reinforced with a millenery wire frame securely whipped down onto the buckram, in order to produce a reasonably sturdy hat. Buckram's main advantage is that hats made with a wire-and-buckram base are less expensive to make, and are lighter, cooler and tend to breathe better than felt hats.
Other materials (In hatmaking)
This is actually pretty good advice for people wanting to learn how to build hats on the cheap. I've used posterboard, plastic jugs, coathangers, cardboard pizza boxes (unused), cereal boxes, etc. Alternative materials are a great way to learn.
Now, if you are wanting to *practice* making hats (or if cost is an issue), lightweight posterboard is a reasonably cheap and practical alternative for working out shapes and fit before working with an unfamilar (or expensive) material or technique. Also, medium- or heavy-weight posterboard is quite sturdy for costume hats, and is often used for making headwear and props for theatrical productions on a smaller budget. A posterboard base can be covered with fabric and finished just as a buckram-and-wire base can, and I have a few 'practice' or 'stage' hats in my costume closet that are indistinguishable from the 'real' hats to the uninformed. I have found that using an equivalent weight of posterboard for a base structure is almost equally durable as an inexpensive sized felt.
All three materials (sized felt, buckram, and posterboard) are sensitive to moisture and will lose shape if they get wet, are crushed or damaged in any way. I suggest that you start out with posterboard to begin with, and, once you are familiar with the shapes, fitting, etc, you can then move on to a felt base hat. The successful 'practice' hats, if nicely finished, will do nearly as well as felt-based ones would for camping events, loaners, dress-up hats for demos, or other situations where one's best costume isn't really recommended anyway.
On Straw Hats
Wow, actual good advice without too much Authoritative Tone. Straw hats are nice, anyway.
The basic woven grass/straw 'farmer hat' has been around for at least 2000 years. They are shown in many medieval illuminations of field workers. I have also seen Roman artwork depicting travellers and laborers wearing woven grass or straw hats of a very familiar shape.
I suggest, if you are unsure of whether they were used in your period, that you check contemporary artwork for images of travellers, laborers and other persons who might need protection from the sun.
Saturday, July 31, 2010
Resurrecting the Bliaut Project and other signs of activity
So, today I am putting out a call for questions regarding bliauts, handout requests (a few are available online, but I have to mail or fileshare the rest), etc.
If anyone needs or wants copies of my handouts (these are the same ones from KWCS a few years back), pleasego download from Lulu.com (free, may ask you to register) or convince me to post them at Scribd (I have an account and have not yet posted anything). If you have the handouts and want to pick my brains for stuff not in them, please ask!
Direct links to the lulu.com pages:
Introduction to 12th century Western European Clothing for Women and Men
Serpentine Braids or Straight as a Scabbard: Women's Court Hairdressing in 12th Century Europe
I have a couple more that are not yet online, and one that is a handout version of the Adventures In Dagging project, done for a workshop. I will hunt those up and mail out copies on request.
I am also considering reworking my old "bliaut handout" into a more updated version, with the cheats (shortcuts in girdle making, mostly) as a separate section. Any interest?
I am duplicating this post over at my livejournal, so if you subscribe to it as well as read here, ask in one place or I might get confused ;)
Monday, July 26, 2010
Frankenblogging Part 6: Medieval Wire Jewellry
Author's note: The Frankenblogging feature is a republication of older content from my former personal webpage, with some annotations. It occurs every Monday morning. Annotations are in this typeface.
On Wire Jewellry in the Medieval Period

Welch, Martin Discovering Anglo-Saxon England isbn 0-271-00894-6
has some information on grave-finds, including color pictures of a double pin connected by a chain and spiraled-wire beads.
has some information on grave-finds, including color pictures of a double pin connected by a chain and spiraled-wire beads.
Ogden, Jack Ancient Jewellry (from the _Interpreting the Past_ series) by ISBN0-520-08030-0
Slim book, lots of information and illustrations. Ancient wire-making techniques, chains, etc.
Slim book, lots of information and illustrations. Ancient wire-making techniques, chains, etc.
Egan, Geoff and Pritchard, Frances Dress Accessories c1150 - c1450 Medieval Finds from Excavations in London: 3 isbn 0 11 290444 0
In-depth catalogue and study of artefacts from the Museum of London excavations of the London waterfront. Lots of clear photographs, some colour plates, many detail drawings of jewelry, belts, pins and other accesories. Extremely useful to the medieval costumer for all the finishing touches.
I've copied several pieces from this book, in particular two copper wire annular brooches, shown on p 254,
fig 164, artefacts 1340 and 1341. Descriptions of these artefacts and two further similar pieces (one in gold, from York) are given on p 256. The chapter of Hair Accessories is of especial interest. I've made several
of the decorative u-pins (p295, fig 196), and recreated possible original states of both of the nearly-complete circlets/headdress frames, which are made of silk-covered wire.
There are also spiraled wire beads and of course chains from Anglo-Saxon england, rome, etc, as well as a sort of naalbinding technique used to make chains from viking times to the present (although modern examples
are mostly from the Middle East and North Africa).
This is another clear case of "I've got a BOOK! I'm an EXPERT NOW!!!" I'm sorry. But, that said, these things are both documentable and easy to make with cheap and widely available materials, which makes them kind of fun to have references for. Hence my geeky excitement.
Jewelry and personal items made after items in Dress Accessories
 A grouping of homemade reproductions of medieval period items.
 A grouping of homemade reproductions of medieval period items, this time with a wooden jewelry casket bound in incised leather.
Author's note: This "wooden jewelry casket" is actually a fairly nicely redressed 1950's or 1960's small mass-produced jewelry box. It's lined on the inside with tooled brass sheet and printed cloth. I think it's still neat enough to get its own future post.

 A full-size (1") and a double-size (2") reconstruction of a small double-spiral ornamented ring brooch in Dress Accessories (p 254, fig 164, artefacts 1340 and 1341). There are actually numerous examples of this type of brooch, in base and precious metals.
My versions are all in copper.

 A conjectural brooch made with a flattened coil wired to two concentric rings and decorated with flat spirals at the compass points. It is all copper.
A reconstruction of a simple but effective little (1") flattened
coil brooch described and illustrated in Dress Accessories. It has no foundation ring. Mine is copper with an iron pin.
 A first attempt to create a period grooming set (earspoon, tweezers and toothpick) after examples shown in Dress Accessories.
This attempt at reproducing one is made from hammered copper sheet, cut and shaped, with fine brass wire wrapped around to provide grips. it is perforated and strung on a small chain, which depends from a brooch.
 Hair or veil pins made after examples shown in Dress Accessories (p295, fig 196). They show the characteristic doubled-spiral decoration. The originals were made in copper, brass, silver and gold (if I recall correctly).
These I made in two sizes, all in copper. I have since made more,
in brass.
 A draft of a conjectural recreation of the fragmentary iron wire headgear with silk-wrapped spiral brass wire decoration shown in Dress Accessories. These pictures are larger than the others to attempt to show the detail of the piece.
Mine is made of heavy copper wire for the base, instead of iron, because it is easier for me to get my hands on. The spiral decoration is made of brass wire, wrapped with cotton embroidery floss, which was then formed into the double spiral motif. The base wire was wrapped with the same floss, and this was used to secure the ends of the wire into smoothly covered loops. Finally, the decoration was attached by wrapping on a further layer of floss. The ends were sewn down to secure them. It is held shut with a matching floss tie.
I have not attempted to attach a veil to this piece because I'm saving the good translucent silk for the final product.

It is not known if the original is in fact a circlet or if it is
some other kind of head ornament, such as a veil frame. The original was found to have fragments of a transparent silk veil attached to the spiral decoration, and one end of was formed into a hook or opened loop. The other end was broken off.
 This is a reconstruction of the silk-wrapped iron wire circlet with silk-wrapped square knot decoration in two colors shown in Dress Accessories. Mine is made of heavy copper wire for the base, instead of iron, because it is easier for me find.
The base wire was wrapped with yellow-dyed unspun silk, and this was used to secure the ends of the wire into smoothly covered loops.
 The ornamental wires are copper, wrapped with blue and red dyed unspun silk. These were carefully knotted around the base wire so as to form decorative square knots at regular intervals (about 1 inch apart). Once these were attached, red silk was used to smoothly
cover the ends of the decorative wires near the loops. Finally, the circlet is held closed by a silky cord tied through the ends.
 The two circlets, together, and another image of the two together, on edge to show details.

In-depth catalogue and study of artefacts from the Museum of London excavations of the London waterfront. Lots of clear photographs, some colour plates, many detail drawings of jewelry, belts, pins and other accesories. Extremely useful to the medieval costumer for all the finishing touches.
I've copied several pieces from this book, in particular two copper wire annular brooches, shown on p 254,
fig 164, artefacts 1340 and 1341. Descriptions of these artefacts and two further similar pieces (one in gold, from York) are given on p 256. The chapter of Hair Accessories is of especial interest. I've made several
of the decorative u-pins (p295, fig 196), and recreated possible original states of both of the nearly-complete circlets/headdress frames, which are made of silk-covered wire.
There are also spiraled wire beads and of course chains from Anglo-Saxon england, rome, etc, as well as a sort of naalbinding technique used to make chains from viking times to the present (although modern examples
are mostly from the Middle East and North Africa).
This is another clear case of "I've got a BOOK! I'm an EXPERT NOW!!!" I'm sorry. But, that said, these things are both documentable and easy to make with cheap and widely available materials, which makes them kind of fun to have references for. Hence my geeky excitement.
Jewelry and personal items made after items in Dress Accessories

Author's note: I took these with a terrible, terrible old digital camera sometime in 1998 or 1999, and the picture quality is just AWFUL. My most heartfelt apologies for that fact. I plan a new post on some of these items with new photos, as I still have most of them.
Author's note: This "wooden jewelry casket" is actually a fairly nicely redressed 1950's or 1960's small mass-produced jewelry box. It's lined on the inside with tooled brass sheet and printed cloth. I think it's still neat enough to get its own future post.

 A full-size (1") and a double-size (2") reconstruction of a small double-spiral ornamented ring brooch in Dress Accessories (p 254, fig 164, artefacts 1340 and 1341). There are actually numerous examples of this type of brooch, in base and precious metals.
My versions are all in copper.

 A conjectural brooch made with a flattened coil wired to two concentric rings and decorated with flat spirals at the compass points. It is all copper.
A reconstruction of a simple but effective little (1") flattened
coil brooch described and illustrated in Dress Accessories. It has no foundation ring. Mine is copper with an iron pin.

This attempt at reproducing one is made from hammered copper sheet, cut and shaped, with fine brass wire wrapped around to provide grips. it is perforated and strung on a small chain, which depends from a brooch.

These I made in two sizes, all in copper. I have since made more,
in brass.

Mine is made of heavy copper wire for the base, instead of iron, because it is easier for me to get my hands on. The spiral decoration is made of brass wire, wrapped with cotton embroidery floss, which was then formed into the double spiral motif. The base wire was wrapped with the same floss, and this was used to secure the ends of the wire into smoothly covered loops. Finally, the decoration was attached by wrapping on a further layer of floss. The ends were sewn down to secure them. It is held shut with a matching floss tie.
I have not attempted to attach a veil to this piece because I'm saving the good translucent silk for the final product.

It is not known if the original is in fact a circlet or if it is
some other kind of head ornament, such as a veil frame. The original was found to have fragments of a transparent silk veil attached to the spiral decoration, and one end of was formed into a hook or opened loop. The other end was broken off.

The base wire was wrapped with yellow-dyed unspun silk, and this was used to secure the ends of the wire into smoothly covered loops.

cover the ends of the decorative wires near the loops. Finally, the circlet is held closed by a silky cord tied through the ends.


Subscribe to:
Posts (Atom)